Spacing and Alignment
![]() Updated 2 months ago
by
Adam Heon
Updated 2 months ago
by
Adam Heon
Spacing and Alignment

Summary
The summary should speak to the user, why this feature is useful and what are the benefits.
- eVolve tab ⮞ Quick Tools panel ⮞ Spacing and Alignment button


Usage
- From the eVolve ribbon, in the Prefabrication panel, click Define Spool.
- From the Create/Define Spool window, enter a value in the Starting Spool Name field, and click OK.
- From the drawing area, using a window selection or crossing window selection, chose the desired elements to spool and click Finish in the Options Bar.
- Continue to select elements to spool or click Finish in the Options Bar to complete the session.
NOTE: The Spacing Tool's predefined selection filter can be modified via the Selection Configuration. Please see the link in the Relevant Articles below.

Window Overview
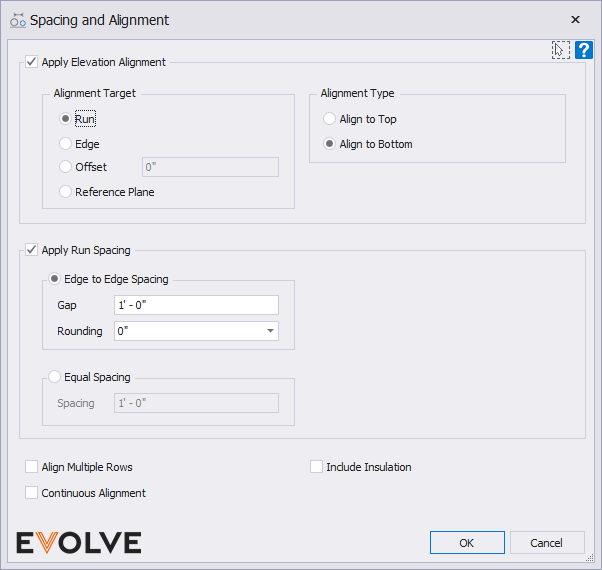
Apply Elevation Alignment panel
Allows elements defined in the tool's Selection Configuration to align to the top or bottom of a specified Alignment Target.
- Alignment Target panel
- Run - Aligns adjacent elements to the top or bottom of a selected element within the run.
- Edge - Aligns elements to a selected surface edge within the view.
- Offset - Applies the Offset value based on the element's reference level.
- Reference Plane - Aligns elements to a selected reference plane within the view.
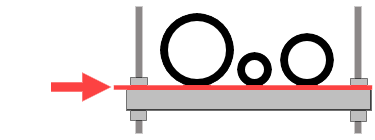
- Alignment Type panel
- Align to Top - Adjusts selected runs to the outer upper point of a specified edge or target element.
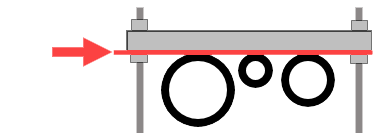
- Align to Bottom - Adjusts selected runs to the outer lowest point of a specified edge or target element.
Apply Run Spacing panel
Allows for rows of elements defined in the tool's Selection Configuration to be spaced as defined within the selected Run Spacing option.
Edge to Edge Spacing option panel -
When enabled, this option applies the spacing from the perimeter of one element to another.

- Gap - the specified value dictates the distance between elements.
- Rounding - applied after the Edge to Edge Spacing, the center-to-center dimension is increased to the specified value.
Equal Spacing option panel
When enabled, this option applies the specified Spacing value based on the selected element's center point.
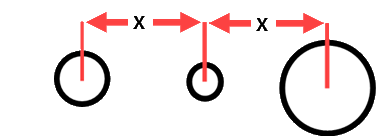
- Spacing - Aligns elements to the same center-to-center spacing.
Dynamic Spacing panel
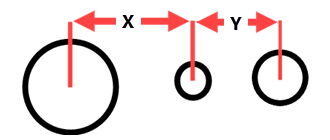
Applies the spacing value in the Horizontal Spacing Configuration based on the selected element's diameter and center point.
- Rounding menu - rounds the spacing designated in the Horizontal Spacing Configuration grid to the nearest specified value.
- Padding dialog box - applied before rounding, the specified value is added to the values in the Horizontal Spacing Configuration grid.
- Configure Spacing button - displays the Horizontal Spacing Configuration grid.
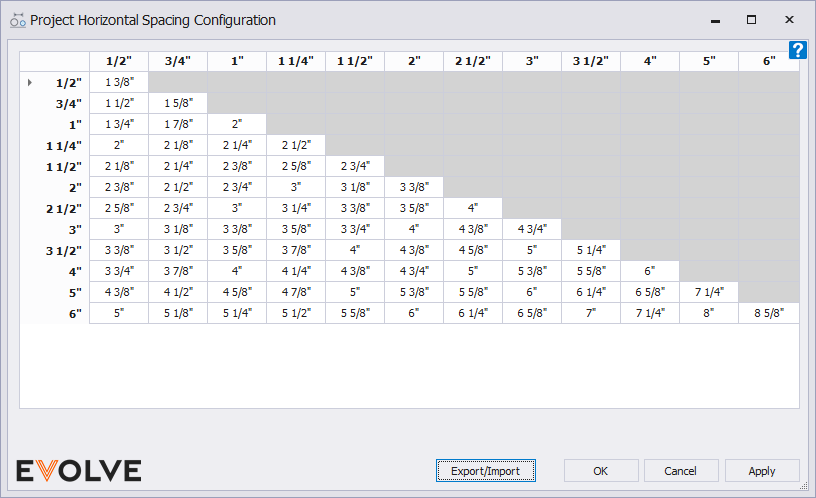
Horizontal Spacing Configuration
The Horizontal Spacing Configuration window contains a grid populated with predefined values used to determine the center-to-center spacing of elements. To modify the values, simply click into a cell, highlighting the current values, enter desired values and click OK or Apply. The spacing configuration may also be exported/imported to share with colleagues.
Options
- Align Multiple Rows - When enabled, elements in selected rows are aligned and/or spaced based on the selected stationary element.
- Continuous Alignment - when enabled, the Spacing and Alignment command remains active until the ESC key is pressed.
- Include Insulation - when enabled, the insulation thickness is accounted for and included in alignment/spacing calculations.

Tips and Tricks
Aligning to a run
NOTE: All selected runs must be parallel with one another.
- From the EVOLVE ribbon, in the Quick Tools panel, click Spacing and Alignment.
- From the Spacing and Alignment window, ensure the Apply Elevation Alignment radio checkbox is selected, then select the desired Alignment Target and Alignment Type, and click OK.
- From the drawing area,
- Select the stationary run.
- Select all of the runs to be aligned with the stationary run.
- From the Options Bar, click Finish. The selected runs are aligned to the stationary run.
- From the Spacing and Alignment window, continue aligning additional runs or click Cancel to close the window.

Aligning to an edge
NOTE: All selected runs must be parallel with one another.
- From the EVOLVE ribbon, in the Quick Tools panel, click Spacing and Alignment.
- From the Spacing and Alignment window, ensure the Apply Elevation Alignment radio checkbox is selected,
then select the desired Alignment Target and Alignment Type, and click OK. - From the drawing area, select all runs to align and click Finish from the Options Bar.
- From the drawing area, select the desired edge to align the selected runs to. The selected runs are aligned to the selected edge.
- From the Spacing and Alignment window, continue aligning additional runs or click Cancel to close the window.

Aligning to a reference plane
NOTE: All selected runs must be parallel with one another.
- From the EVOLVE ribbon, in the Quick Tools panel, click Spacing and Alignment.
- From the Spacing and Alignment window, ensure the Apply Elevation Alignment radio checkbox is selected, then select the desired Alignment Target and Alignment Type, and click OK.
- From the drawing area, select all runs to align and click Finish in the Options Bar. The selected runs are aligned to the selected reference plane.
- From the Spacing and Alignment window, continue aligning additional runs or click Cancel to close the window.

Edge to Edge Spacing
NOTE: All runs must be parallel with one another. Spacing may be applied to runs with different elevations, however, the spacing tool will not change the elevation of the runs. Additionally, spacing is not be applied to stacked runs(runs with the same z-axis coordinates as the stationary run).
- From the EVOLVE ribbon, in the Quick Tools panel, click Spacing and Alignment.
- From the Spacing and Alignment window, ensure the Apply Run Spacing radio checkbox is selected, then select the Edge to Edge Spacing radio button and enter the desired value in the Gap dialog box, and click OK.
- From the drawing area,
- Select the stationary run.
- Select all of the runs to which the spacing will be applied.
- From the Options Bar, click Finish. The spacing is applied to the selected runs.
- From the Spacing and Alignment window, continue applying the spacing to additional runs or click Cancel to close the window.
Rounding
When applying edge-to-edge spacing, an optional rounding value may be applied to the center-to-center dimensions effectively turning the Gap value into a minimum distance. The center-to-center dimensions may be rounded to the nearest 1/8", 1/4", 1/2", or 1". Rounding is not applied if the value in the Rounding menu is set to 0". The edge-to-edge spacing is applied, the center-to-center distance is evaluated, then if specified, the rounding is applied.

Center to Center Spacing
WARNING: Depending on the diameter/size of the duct/pipe, this tool may cause collisions(elements to overlap). After the center-to-center spacing is applied, a visual inspection of all selected elements is recommended.
NOTE: All runs must be parallel with one another. Spacing may be applied to runs with different elevations. However, the spacing tool will not change the elevation of the runs. Additionally, spacing is not be applied to stacked runs(runs with the same z-axis coordinates as the stationary run).
- From the EVOLVE ribbon, in the Quick Tools panel, click Spacing and Alignment.
- From the Spacing and Alignment window, ensure the Apply Run Spacing radio checkbox is selected, then select the Edge to Edge Spacing radio button and enter the desired value in the Spacing dialog box, and click OK.
- From the drawing area,
- Select the stationary run.
- Select all of the runs to which the spacing will be applied.
- From the Options Bar, click Finish. The spacing is applied to the selected runs.
- From the Spacing and Alignment window, continue applying the spacing to additional runs or click Cancel to close the window.
