Role Manager
![]() Updated 6 months ago
by
Kerry Poe
Updated 6 months ago
by
Kerry Poe
Role Manager

Summary
Role Manager allows an Admin and/or Power User to define and upload Project & User configs within Revit. Roles are set to users within the Admin portal of EVOLVE, see the prerequisite article below for more information.
- eVolve tab ⮞ Resources panel ⮞ Settings ⮞ Role Manager button


Prerequisites

Usage
Configurations can be assigned directly from within the Role Manager window.
Creating a configuration rule
- From the EVOLVE ribbon, in the Resources panel, click the Settings menu and click Role Manager.
- From the Role Manager window, in the Data Navigator (located in the lower left corner of the grid), click Add new
 to create a new rule.
 - From the New: Role Manager window, define the following:
- User Role - Select which role is applied to the configuration rule.
- Upload New File - Browse to select the configuration file.
- Description - optional - supply a brief summary of the file contents for future reference.
- Group - optional - define a grouping to quickly sort/locate the configuration rule in the grid.
- Once the configuration file is attached and a role is selected, click OK to complete.
- Repeat this step for each configuration file as needed.
NOTE: Project configuration files should be assigned to "All Users". User configuration files are typically assigned to each user role.
Assigning a configuration from a feature
Configurations can also be assigned from within the various EVOLVE features using the "Send to Roles Manager" shortcut feature. The Toolbox feature is used in the steps below. However, the same steps may be applied whenever you see this icon  .
.
- From the Utilities panel menu, click Toolbox Configuration.
- From the Toolbox Configuration window, click Role Manager icon located in the right corner of the window.
- From the New: Role Manager window,
- Select the User Role to use.
- The configuration file is automatically attached, and the Name and Description fields are prepopulated.
- Click OK to complete.

Window Overview
Role Manager window
The Role Manager window creates configuration rules for the predefined user roles. Any user can view the information, but only Power Users can make edits. These rules are used to specify which roles can access a file and the location of the file. For example, you may specify that User Role A may access (read/write) a certain configuration XML. If no path is specified, the file is assumed to exist in the application's default profile directory.
Default profile directory - C:\Users\UserName\AppData\Roaming\eVolve\eVolveProductName
In another example, User Role B may access a report file (.repx), specifying a directory will create a folder within the profile folder; i.e., if Report Files is specified in the Directory field, a Report Files folder is created within the profile directory -
C:\Users\[UserName]\AppData\Roaming\eVolve\[eVolveProductName]\Report Files.
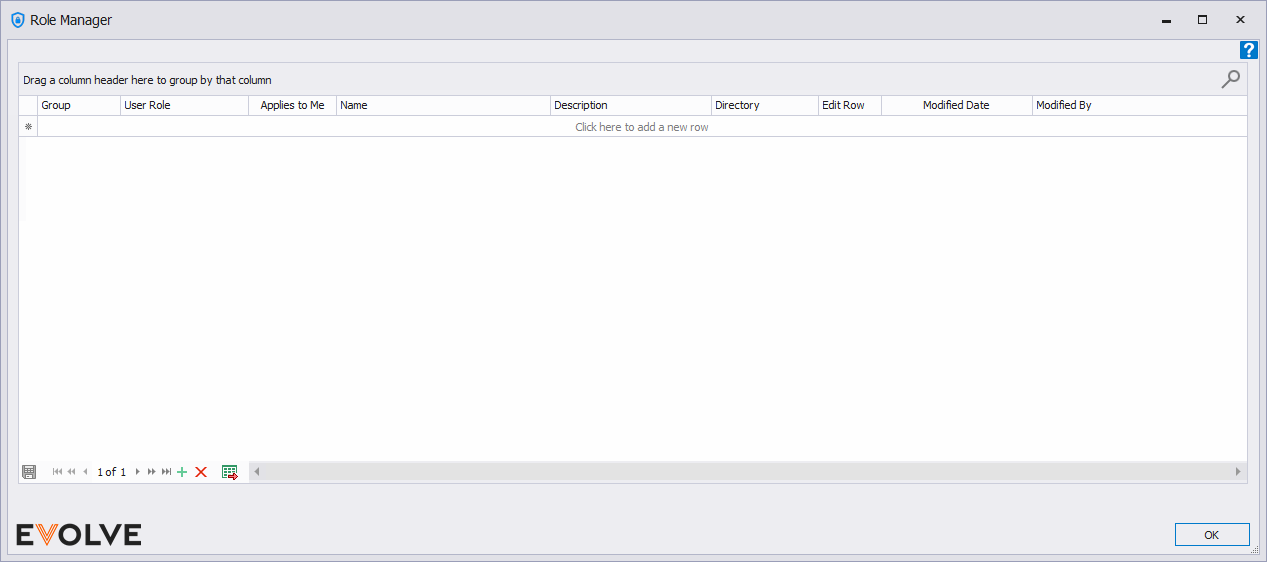
Columns
- Group - Displays the rule's assigned category/type.
- User Role - Displays the rule's assigned User Role.
- Applies to Me checkbox - Specifies if a rule relates to the current user.
- Name - Displays the file name associated with the rule.
- Description - Displays the provided additional information about the file associated with the rule.
- Directory - If provided, the directory sub-path, respective to the EVOLVE's product profile folder, is displayed.
- Edit Row - Used to launch the New: Role Manager window for the selected row.
TIP: Double-clicking any cell in the row will also display the New: Role Manager window for the selected row. - Modified Date - Displays the time and date the rule was last modified.
- Modified By - Displays the user login of the person who last modified the rule.
New: Role Manager window

Controls
- User Role - Displays a list of users or groups of users whose assigned permissions and privileges are predefined.
- Name - (optional) - This field is automatically filled when selecting a file.
- Directory (optional) - Directory sub-path, respective to the EVOLVE's product profile folder, where the file will be stored. This provides the ability to store configurations and other file types within subfolders.
- NOTE: The use of this option is not common and is intended as a function to distribute additional files to users. Please reach out to support@evolvemep.com with questions on this option if needed.
- Description (optional) - Provides additional information regarding the configuration rule.
- Group (optional) - A user-defined field to help categorize and sort the list of entries in the Role Manager grid.
- Upload New File - Browse to select the configuration file.
- TIP: Multiple files may be selected and uploaded at once. When doing so, a configuration is created for each file.
- Overwrite this configuration, if it already exists (optional) - A checkbox to replace an existing configuration if one exists with the same name for the same role.

Tips and Tricks
File limitations
Files are limited to 3 MB compressed. Practically, text files (XML for example) will compress very well, so it is entirely possible that a 10 MB XML file will compress to the supported size, however binary files (such as XLSX, PDF) typically will not compress well.
Roles Types
The current user role is determined at login and refreshed when a license "phone home" event occurs.
Role | Notes |
Power User | Has "admin" permissions. Users with this role can upload configs and other files and assign them to specific roles or make them available to all roles. |
Advanced User | This role is intended to be granted to more experienced users generally able to set up their own environment. NOTE: If a user has not been assigned an explicit role, they are assumed to be this role. |
User Roles [1-5] | These roles are intended to provide a controlled user experience. From a practical standpoint, all of these roles function exactly the same; the number designation is simply a mechanism to deliver different configuration settings. NOTE: You may provide a "friendly" name for these roles. Where applicable, the friendly name appears, but the actual role in the backend is User Role [1-5],. |
Configuration Loading
Files are stored in the EVOLVE profile directory (where machine configuration data is stored) for the product they use. By providing a Directory value (ex. "Pipe\Example"), the file will be placed in the specified sub-directory off of the profile directory (ex. "..\Pipe\Example").
If a configuration file is uploaded and specified to go directly to the user's profile directory (no Directory value specified), it will overwrite their existing workstation configuration.
Certain configurations will cause refreshes to run automatically:
File | Feature | Action |
RibbonTabPanels.xml | Ribbon Tab Customization | Prompts the user to restart Revit for the changes to take effect. |
LaunchPaneConfiguration.xml | Toolbox | Rebuilds the Toolbox panel with the updated configuration. |
CoreUserAnnotationTags.xml | User Tags | Rebuilds the User Tags dropdown button in the Revit ribbon. |
UserShortcuts.xml | Shortcuts | Rebuilds the Shortcuts dropdown button in the Revit ribbon. |
NOTE: If the configuration is not stored using the default configuration file name, then it will simply be downloaded as a file but not automatically used in any manner.
Files will be refreshed when Revit launches and when the Login command is launched. The refresh process will compare the hash of the local files already present to those assigned by the user's Role on the server and download any from the server that either don't match or are missing locally. At no point will any local files ever be deleted, even if one is removed from the server configuration.
"Send to Roles Manager" Shortcut
Clicking this button will send the configuration as it is currently set in the UI at the that moment to a New: Roles Manager entry dialog. From this dialog, the user can update the information as required before submitting it to the server.
