Trapeze Family Overview
![]() Updated 2 months ago
by
Adam Heon
Updated 2 months ago
by
Adam Heon
eVolve Trapeze Hangers
Overview
Family Names
- The following will apply to families that have a _v6 or greater within the family name
- Current list of eVolve hanger families:
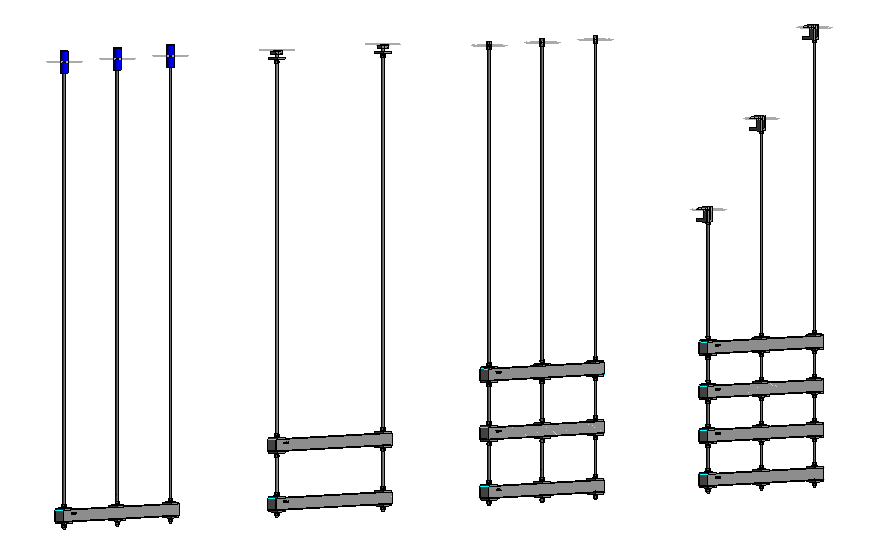
- eE_ASM_HS_Trapeze_NWH_1_Tier_v7.rfa
- eE_ASM_HS_Trapeze_NWH_2_Tier_v7.rfa
- eE_ASM_HS_Trapeze_NWH_3_Tier_v7.rfa
- eE_ASM_HS_Trapeze_NWH_4_Tier_v7.rfa
- eE_ASM_HS_Trapeze_1_Tier_v7.rfa
- eE_ASM_HS_Trapeze_2_Tier_v7.rfa
- eE_ASM_HS_Trapeze_3_Tier_v7.rfa
- eE_ASM_HS_Trapeze_4_Tier_v7.rfa
Note: NWH indicates no hardware included around the strut/rod connection
Family Parameter Options
Instance Properties
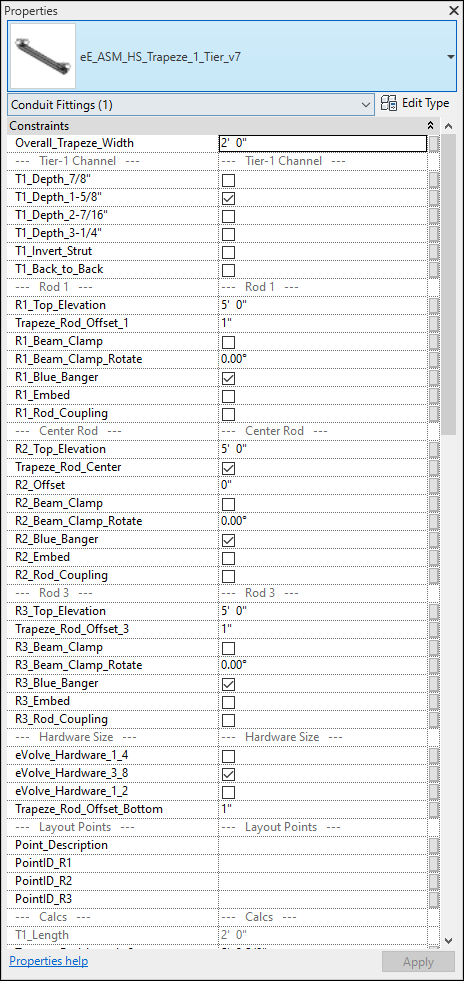
- The following is a breakdown of the user controlled parameters that make size/visibility changes to the trapeze family. Groupings of parameter controls are based on 2 main elements of the family: Strut & Rod Configurations.
- Overall Trapeze Width- End to end width of the strut
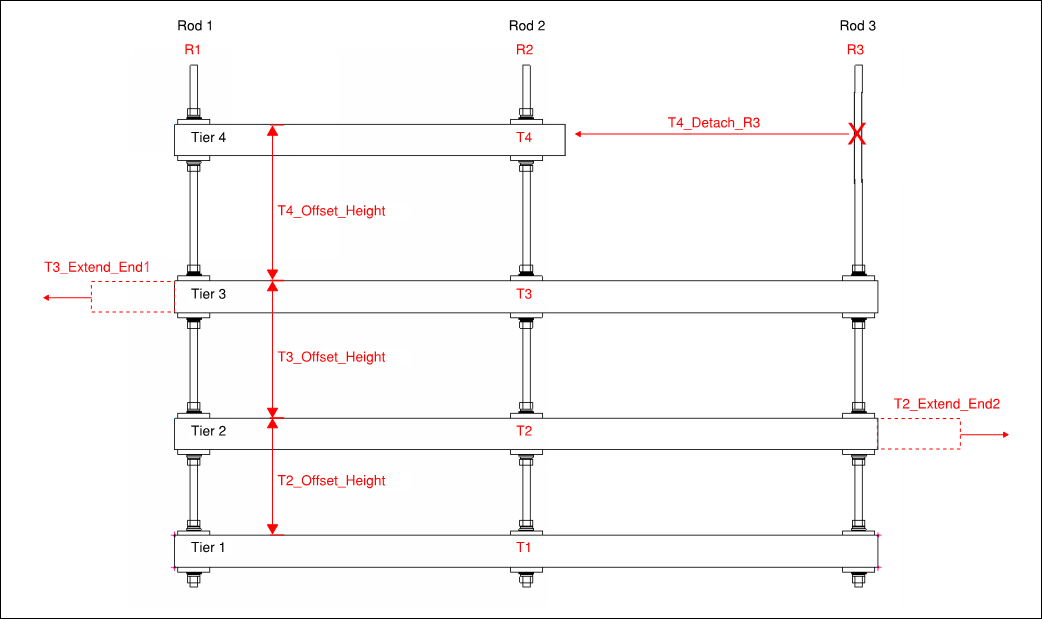
- Tier #- Each grouping of parameters is prefaced with a T# to designate which tier the parameters control. For example T3 = Tier 3 (or the 3rd level of strut)
- T# Offset Height- The distance from the top of the strut (of the tier below, i.e. Tier1) to the top of the strut of the designated tier (Tier 2).
- T# Detach R1- Disconnects the rod connection from the strut, the suffix R# indicates which rod is disconnected.
- T# Detach R2- Same as above for rod 2
- T# Detach R3- Same as above for rod 3
- T# Extend End 1- This will stretch the strut length outward by the specified value, End1 is the same side as Rod 1
- T# Extend End 2- Same as above but for the opposite end (near Rod 3)
- Tier # Channel- Options for strut depth, invert, back to back (T# can be T1, T2, T3,or T4)
- T#-Depth 7/8"- Strut depth adjustment
- T#-Depth 1-5/8"- Strut depth adjustment
- T#-Depth 2-7/16"- Strut depth adjustment
- T#-Depth 3-1/4"- Strut depth adjustment
- T#-Invert Strut- Reverses the direction of the open end of the strut to point down (default is up)
- T#-Back to Back- Makes the strut a back-to-back strut type in the size checked above
- Rod # (Rod 1(L)or 3(R))
- R# Top Elevation- This value is entered via the place hanger feature. This is used to do the internal calculation to obtain the proper rod length, based on the Offset value of the family and the attachment height.
- R# Trapeze Rod Offset- Specifies the distance from the end of the strut to the rod
- R# Beam Clamp- Turns on the beam clamp family
- R# Beam Clamp Rotate- Rotate beam clamp by amount entered
- R# Blue Banger- Turns on the blue banger family
- R# Embed- Turns on the embed family
- R# Rod Coupling- Turns on the rod coupling family
- Center Rod- (Always Rod 2)
- R2 Top Elevation- This value is entered via the place hanger feature. This is used to do the internal calculation to obtain the proper rod length, based on the Offset value of the family and the attachment height.
- Trapeze Rod Center- When checked, turns on the center rod and associated hardware
- R2 Offset- Specifies the distance from End1 to the center rod
- R2 Beam Clamp- Turns on the beam clamp family
- R2 Beam Clamp Rotate- Rotate the beam clamp by the entered amount
- R2 Blue Banger- Turns on the blue banger family
- R2 Embed- Turns on the embed family
- R2 Rod Coupling- Turns on the rod coupling family
- Hardware Size
- eVolve Hardware 1/4"- Use 1/4" Rod & Hardware for the trapeze
- eVolve Hardware 3/8"- Use 3/8" Rod & Hardware for the trapeze
- eVolve Hardware 1/2"- Use 1/2" Rod & Hardware for the trapeze
- Layout Points- Turn on in type properties
- Point Description- User entered description for visually keeping track of point locations
- PointID R1- Point assigned by points manager
- PointID R2- Point assigned by points manager
- PointID R3- Point assigned by points manager
Type Properties
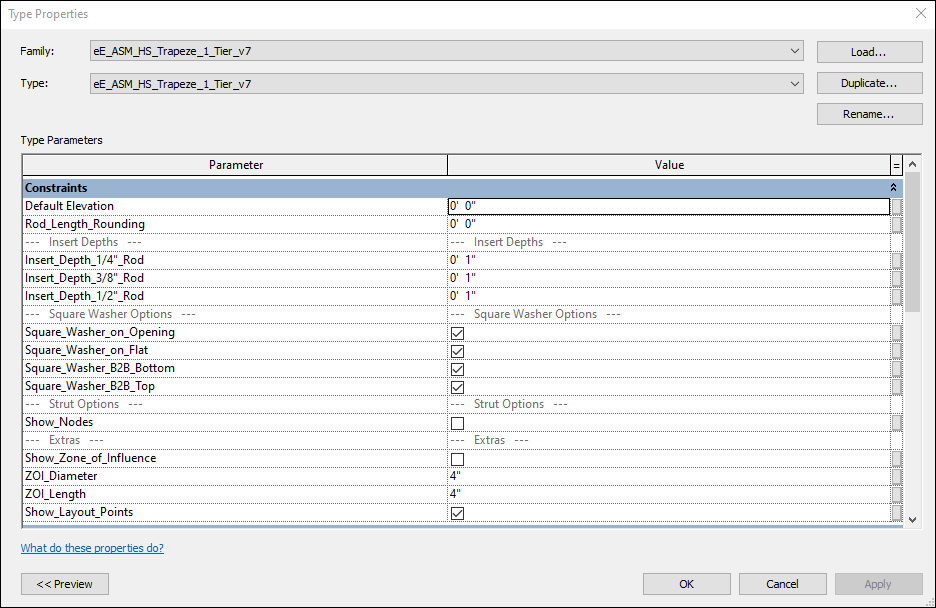
- Rod Length Rounding- Because a longer rod must be cut to create the finished rod, eVolve allows for the rounding of rod lengths. Entering a length (ex..6") in the Rod_Length_Rounging parameter field, in the type properties, will round up the rods for that hanger to the nearest entered increment (ex..6" increments).
The Rod_Length_Rounding parameter is ONLY a Reporting Parameter and will not change the actual rod lengths in the model. Adjusted rod lengths will appear in BOM's and Schedules.
- Insert Depths- Enter the desired depth to insert each rod type into the surface it's attached to.
- Insert Depth 1/4" Rod
- Insert Depth 3/8" Rod
- Insert Depth 1/2" Rod
- Square Washer Options
- Square Washer on Opening- Show a square washer on the open face of the strut
- Square Washer on Flat- Show a square washer on the flat face, opposite of the open face
- Square Washer B2B Bottom- When back to back strut is selected, shows a square washer on the bottom open face
- Square Washer B2B Top- When back to back strut is selected, shows a square washer on the top open face
- Strut Options
- Show Nodes- Turns on the embedded node family
- Extras
- Show Zone of Influence- Turns on a clearance zone around the top of the rod assembly
- ZOI Diameter- The Diameter of the Zone of Influence
- ZOI Length- The Length of the Zone of Influence
- Show Layout Points- Turns on the layout point family