Macro Automation
![]() Updated 10 months ago
by
Adam Heon
Updated 10 months ago
by
Adam Heon
Macro Automation

Summary
The Macro Automation tool speeds up and simplifies the macro creation process. Utilizing Element Filters will drastically reduce the size of the codebase and allow it to be more universal. In-house teams can write simple code blocks to handle the work for users to decide how and when to use it by leveraging custom element filter rules.
- eVolve tab ⮞ Utilities panel ⮞ Macro Automation button


Usage
Creating an Automation Rule
- From the eVolve ribbon, in the Utilities panel, click Macro Automation.
- From the grid, click the top row with Click here to add a new row. displayed and add the following required information:
Required:
- Rule Name - the name does not have to be unique as you may utilize Description, Group, and Sub Group to further distinguish it from other profiles.
- Macro Source - select Application or Document.
NOTE: Document Macros are not supported in Revit 2025 and higher versions, For more information, please see the following Autodesk article.
- Available Macros - macros for the selection are displayed.
NOTE: If undefined, "Copy from Parameter must be provided." is displayed in the Error Message column.
- Element Filter - defines the elements the Macro Automation rule will run against.
Optional:
- Run Order - automatically assigned if undefined.
- Run in Second Pass - the default state is checked.
- Description - blank if left undefined.
- Group - blank if left undefined.
- Sub Group - blank if left undefined.
- Execute On - the default value is Manual Only if left undefined.
- Enabled - if unchecked, the rule is disabled and will not run. - After the Required and Optional fields are defined, click Apply. The new row is added to the grid.

Window Overview
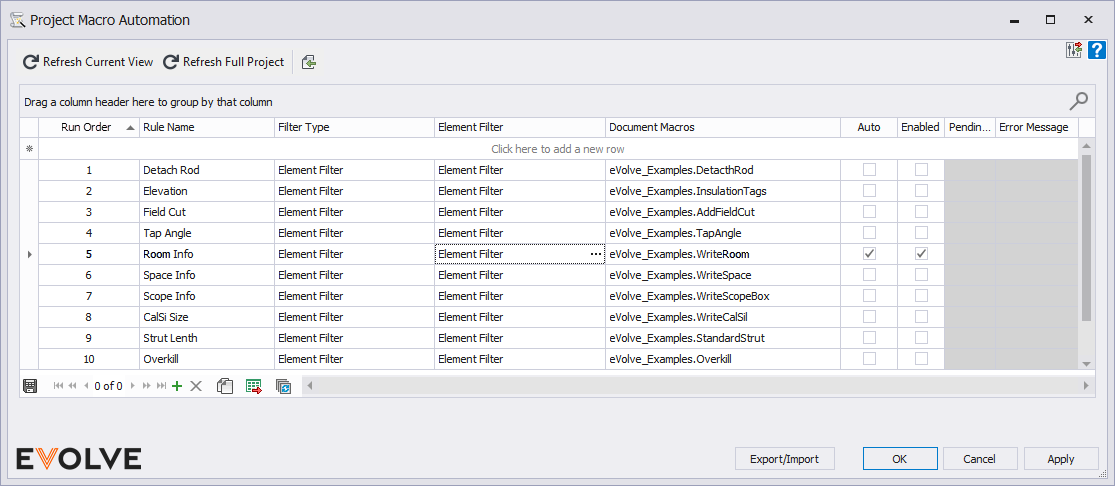
Tool Palette buttons
- Refresh Current View - used to re-run the selected rules on the current active view.
- Refresh Full Project - used to re-run the selected rules on the entire project view.
- Export Rules (Removed as of 6.2)- used to transfer the selected rules to another project.
- Import Rules (Deprecated as of v6.2) - used to bring in rules from another project.
- Configuration Exchange - Used to import/export rules; please see the Configuration Exchange article for more information.
Grid Columns
- Run Order - used to define the sequence in which the rules are executed, 1 is 1st, 2 is 2nd, 3 is 3rd, etc.
- Rule Name - used to apply a label to a rule.
- Description - used to provide additional information about the rule.
- Group - used to assign a category/type to a rule.
- Sub Group - used to a subset of a group/category to a rule.
- Element Filter - used to define the categories and optional conditions which elements and their parameters are filtered against.
- Macros Source
- Application - lists all available macros in Revit.
- Document - lists all available macros in the project.
NOTE: Document Macros are not supported in Revit 2025 and higher versions, For more information, please see the following Autodesk article.
- Available Macros - the menu is populated based on the selected Macro Source and lists all available macros for the selection.
- Enabled - if unchecked, the rule is disabled and will not run.
- Execute On - defined when/how the rule runs.
- Manual Only - the rule will only run when either the Refresh Current View or Refresh Full Project button is manually clicked.
- Any Update - the rule runs when any change to the drawing is made.
- New Element Creation - the rule will only run when an element is placed on the drawing area.
- Existing Element Change - the rule runs when an existing element is modified.
- Run in Second Pass - indicates whether the rule runs after all other processing has been completed; see below for more information.
Record Navigator buttons
- Add - used to add a new row to the grid.
- Delete - used to delete selected row(s).
- Duplicate - used to duplicate selected rows.
- Export Grid - exports the grid as currently displayed to Excel.
- Bulk Update - allows for the values in multiple selected rows to be revised at once.

Tips and Tricks
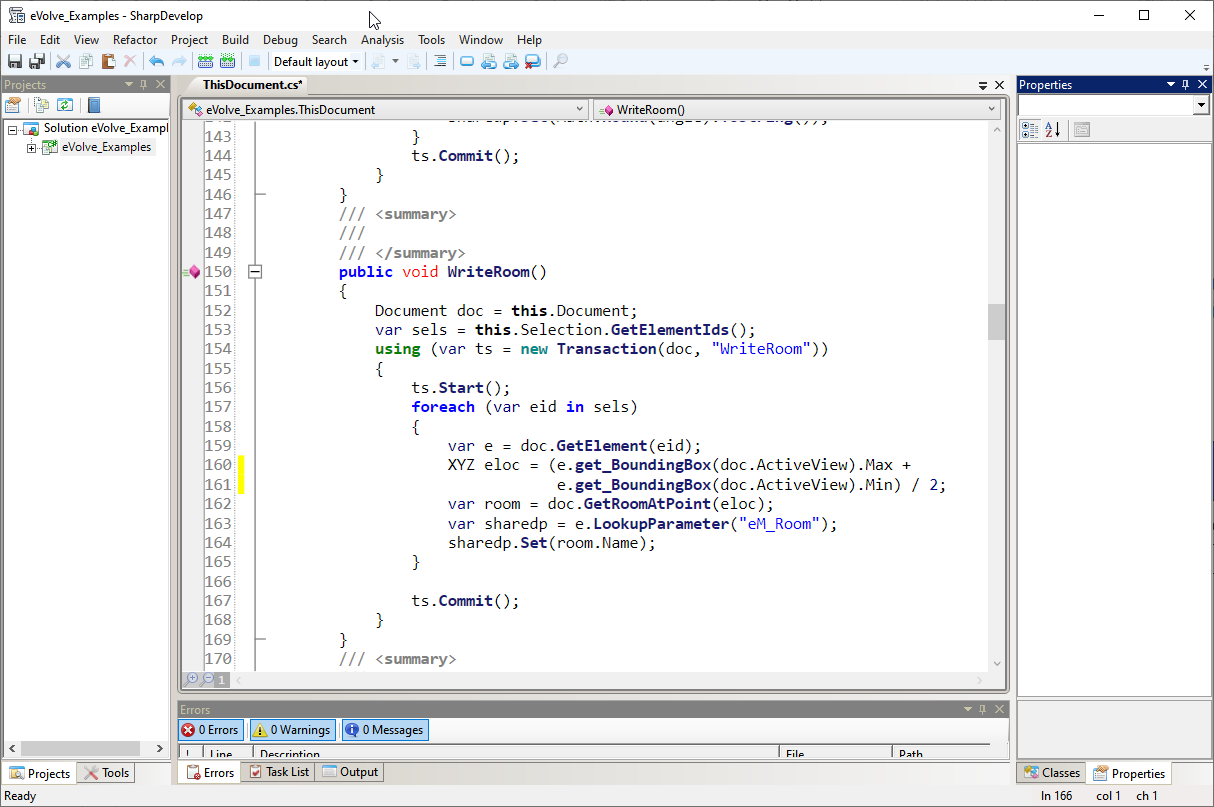
Using a Macro
To use this tool, the project must have an existing macro. This macro will only need to handle the "work" needed, as the Automation rule will handle the firing mechanism and element collection.
Below is a simple example that writes the Room Name (of the room an element is in) to a custom shared parameter. Note that this block and many others can be found here.
Run in Second Pass
The Run in Second Pass option allows users to run rules after Revit and eVolve have completed processing instead of before. If the Run in Second Pass option is unchecked when a rule runs, and the expected elements are not colored, check the Run in Second Pass option.
NOTE: If the same parameter is being changed in both the first pass and second pass, the updating of the second pass parameter(s) change will fail, throwing an error. However, parameters may be changed multiple times in the same pass.
Best Practices
Technical Notes
- When a rule is satisfied, the respective Macro is queued for execution after the current Revit modify operation is complete.
- This feature does not honor dynamo scripts; however, the code equivalent can be converted and used.
- For proper use of the Macro Automation feature, review the
MacroAutomationSample.txtfile located in C:\Program Files\eVolve\eVolve Electrical for Revit 20xx\Resources
Security Note
Running macros does carry a security risk in that "arbitrary code" may be executed from within Revit. The worst-case scenario is something like User 1 creates a rule in the model which executes a Macro/PowerShell script on a parameter update. User 2 then opens this model on his machine, and the rule is triggered, which executes the code User 1 put in place (on User 2's machine).
