Creating an Element Filter
Creating an Element Filter

Summary
Element Filters allow custom component selections by defining desired Revit Categories and rulesets/conditions elements must adhere.
- Skip step 2 if the dockable EVOLVE Element Filter pane is enabled.
- To enable the dock-pane - eVolve tab ⮞ Utilities panel ⮞ Element Filter button

- From the Data Navigator located at the bottom of the grid, click the green plus button

NOTE: you can quickly "add" an element filter by clicking on the top row and entering a value into either the HotKey or Order cell (the Name cell is disabled at this point), but this merely creates a filter without any Categories, Conditions, or Options defined. If you add a new element filter from the grid after the row is created, modify the new row to define a Name, Categories, Conditions, and Options.

Usage
Creating an Element Filter
- From the record navigator, click the Add new button. The Element Filter window is displayed.
- From the Element Filter window, in the Filter Name panel, enter a filter name.
TIP: Specify a Group and Sub Group to sort and categorize your filters. - From the Categories panel, select the category or categories to apply the filter.
- From the Rules panel, based on the selected categories, define the AND/OR condition(s) for the available parameters.
- Click Add Condition; a new row appears in the grid.
- From the new row, click the Parameter menu and select the desired parameter.
- From the new row, click the Operator menu and select the desired comparative action.
- From the new row, click the Input Type menu and select the desired method.
- From the new row, depending on the selected Input Type, enter text in the Value cell.
- Optional - You may continue to add more conditions to the AND/OR statement(s) to further refine the results of the Element Filter.
- From the Options panel, select any necessary options.
NOTE: The Options tab allows users to define the default action for the rule. If this is set to anything other than Select Action, then the action defined will be automatically applied after a double click on the rule within the palette. - Click OK.
TIP: You may find yourself creating the same type of element filters with slight differences, use the Copy from Existing feature to quickly add the elections in Categories, Rules, and Options panels from an existing element filter, then modify the categories and conditions to suit the needs of the new element filter.

Window Overview
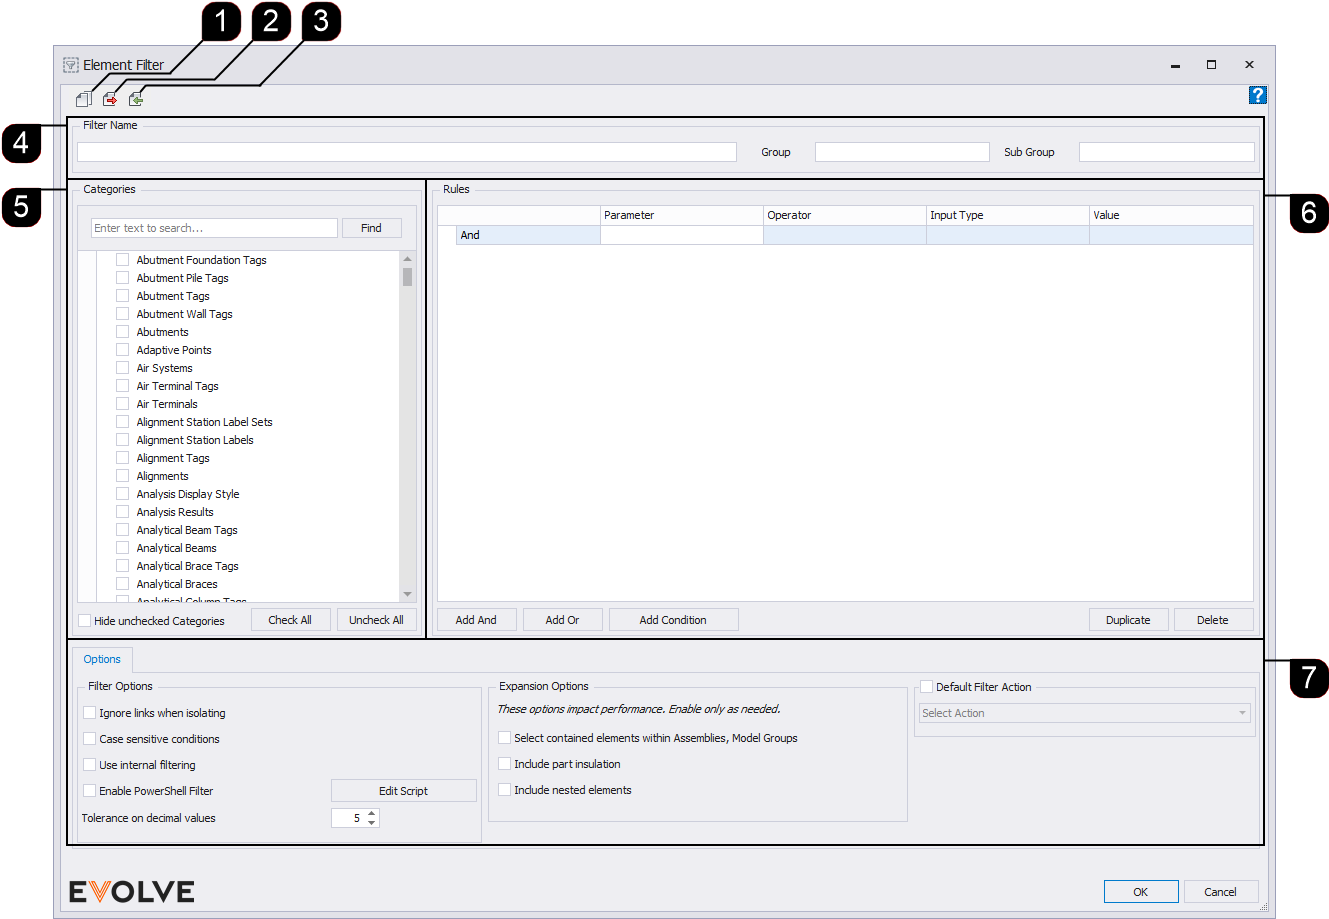
- Copy from Existing - duplicates an available Element Filter from the network or local computer as the current input. Use this to create similar rules or as a template from an (Embedded Filter).
- Export Filter - saves the current input into an .EVFilter file.
NOTE: Element filters exported in 7.4.2 and below can still be imported into 8.0. Element filters exported in 8.0 cannot be imported to 7.4.2 and below. - Import Filter - Opens a .EVFilter file.
NOTE: Element filters exported in 7.4.2 and below can still be imported into 8.0. Element filters exported in 8.0 cannot be imported to 7.4.2 and below. - Filter Name panel - Contains the Filter Name, Group, and Sub Group fields used to sort and organize the filters in the dockable Element Filter palette.
- Categories panel - Used to specify the category or categories the rule sets are run against. When creating the conditions, the available parameters depend on the selected categories.
- Rules panel - Used to create the AND/OR rule sets.
- Add And button - Creates a logical AND condition. All AND conditions must be true for the ruleset to be considered a match.
- Add Or button - Creates a logical OR condition. At least one OR condition must be true for the ruleset to be considered a match.
- Add Condition button - Creates constraints/rulesets for the Add And/Add Or conditions.
- Duplicate button - Copies the selected row in the grid.
- Delete button - Removes the selected row in the grid.
- Parameter cell - Lists the most common parameters based on the selected Categories. Parameter names not listed, which are unique to selected Categories, may be manually entered.
- If only a few parameters, or none, appear in the drop-down, it may be due to multiple categories being selected, and the desired parameter may not exist in all categories. To correct this, go back and reduce the number of categories for the rule. The other categories may be added later. A missing parameter name can be entered manually but must be exact. Parameter names are case-sensitive.
- If the parameter you seek is unavailable, you might need to create a shared parameter. In some cases, you may need to use the Parameter Sync tool. - Operator cell - Lists comparative actions that may be performed on the condition.
- Input Type cell - Lists available methods used to compare the parameter value to that of the Input Type.
- Constant Value - The criteria is typed in the Value field. For example, if searching for RMC Fittings, consider the "contains" operator, "constant value" input type, and RMC in the value field.
- Prompt for Value - When the Element Filter runs, this option displays a dialog allowing the specified value to be used in the query. Text typed in the Value field is used in the dialog's prompt or the Revit status bar, depending on the Input Type option.
- Compare to Parameter - Used to match parameter values.
- Single Element Selection - Only one element in the model can be selected when the rule is activated, then the rule acts on that object. For example, a user may want to select all objects that match the same service type or service abbreviation; therefore, the rule would ask the user to select one object and find all matches in the model.
- Multiple Element Selection - To duplicate the old Hide button functionality, the rule must allow the selection of multiple elements. This setting allows users to pick objects on different services and will apply a Hide action on all elements with the same service abbreviation as the objects selected.
- Value cell - User-defined value dependent on the Input Type.
- Options panel/tab - contains various options that can be applied when the filter is invoked.
* - feature/option only appears in the embedded element filter
** - feature/option does not appear in the embedded element filter- ** Default Filter Action - When enabled, a standard behavior must be selected and applied when the filter is invoked.
- Select Action - This default action forces the user to select what action to apply when the rule is activated. If Default Filter Action is not selected, this will be the action used.
- Select - Select the elements to run any eVolve or Revit command on the selected objects
- Isolate - Isolates the elements in the current view
- Isolate (Temporary) - Creates a new temporary view and isolates the elements
- Show - Shows elements that were previously hidden in the current view
- Hide - Hides the elements from the current view
- Make Halftone - Applies halftone to the selected elements
- Make Transparent - Applies transparency to the selected elements
- Ignore links when isolating - When isolate or isolate (Temporary) actions are used linked elements will not be hidden.
- Tolerance on decimal values - Defines the precision used when working with Revit INTERNAL decimal values (higher value means less tolerance).
- Case sensitive conditions - When enabled text searches are case sensitive. Performance Note: This can negatively impact query speed. Only enable if necessary.
- Use internal filtering - When enabled, native Revit filtering is bypassed in favor of internal logic. This processing can be much slower and should only be enabled in particular circumstances where Revit filtering does not give intended results which are verifiably correct.
- ** Expansion Options:
- Select Contained elements within Assemblies, Model Groups - When enabled, elements within the containers are included within the selection. If not enabled, only the container element itself is selected.
- Include part insulation - When enabled, part insulation on matching elements is included within the selection.
- Include nested elements - When enabled, nested elements on matching elements is included within the selection.
- * Enable PowerShell Filter - allows for a PowerShell script to execute against the selection and apply custom logic to refine the selection further.
- * Edit Script button - launches the PowerShell Script editor.
- * Linked Models tab - displays a list of available linked models. A model must be "Loaded" to appear in the list.
- This tab is contextual and only appears in embedded element filters for relevant features, such as Data Profiles and Find Elements.
- ** Default Filter Action - When enabled, a standard behavior must be selected and applied when the filter is invoked.
