Smart Bend Settings


Summary
To further enhance project efficiency and accuracy, the Smart Bend Settings window allows users to choose from many different conduit benders commonly found in the field and add new or custom benders to be utilized. Like many other features, this one utilizes our powerful grid menus. These menus are highly customizable and allow for on-the-spot editing of bender data. To make this feature even more efficient. Different benders can be assigned for specific diameters of the available conduit types to make this feature even more efficient. These settings can easily be shared by exporting and importing them into a project.
- eVolve tab ⮞ Resources panel ⮞ Settings menu ⮞ Smart Bend Settings button


Usage
To Add a New Bender:
- From the Smart Bends window, on the Bend Lookup tab, click Click here to add a new row located at the top of the grid.
- Name the new bender type, then add the appropriate information into the remaining fields. The specific bend values are located in the bender manuals.
- Click Apply or OK to save the bender data into the project settings.
To Add Multiple Benders:
- From the Smart Bends window, on the Bend Lookup tab, click Export/Import.
- From the menu, click Export to File.
- Open the new .xml file, locate a section with similar sizes to the new bender, and copy it onto a blank page. Swap out the name and bend data to the new bender.
- Copy and paste that section back into the original .xml as an additional bender and save the file.
- From the Smart Bends window, on the Bend Lookup tab, click Export/Import.
- From the menu, click Import from File.
- Click Apply or Ok to save the bender data into the project settings.
To Assign Benders to Conduit Types:
- From the Smart Bends window, click the Bend Configuration tab.
- Select an available Conduit Type from the menu and a drop-down will appear below it with the listed benders and diameters they are assigned to for that type.
- To make a change, edit the Bender Type/Name next to each diameter. Be sure it matches identically to a bender that is listed in the Bend Lookup menu.
- Click Apply or Ok to save the bender data into the project settings.

Window Overview
- Refresh Current View - updates all smart bends in the active view after modifications have been made to the Bends Settings.
- Refresh Full Project - updates all smart bends in the project after modifications have been made to the Bends Settings.
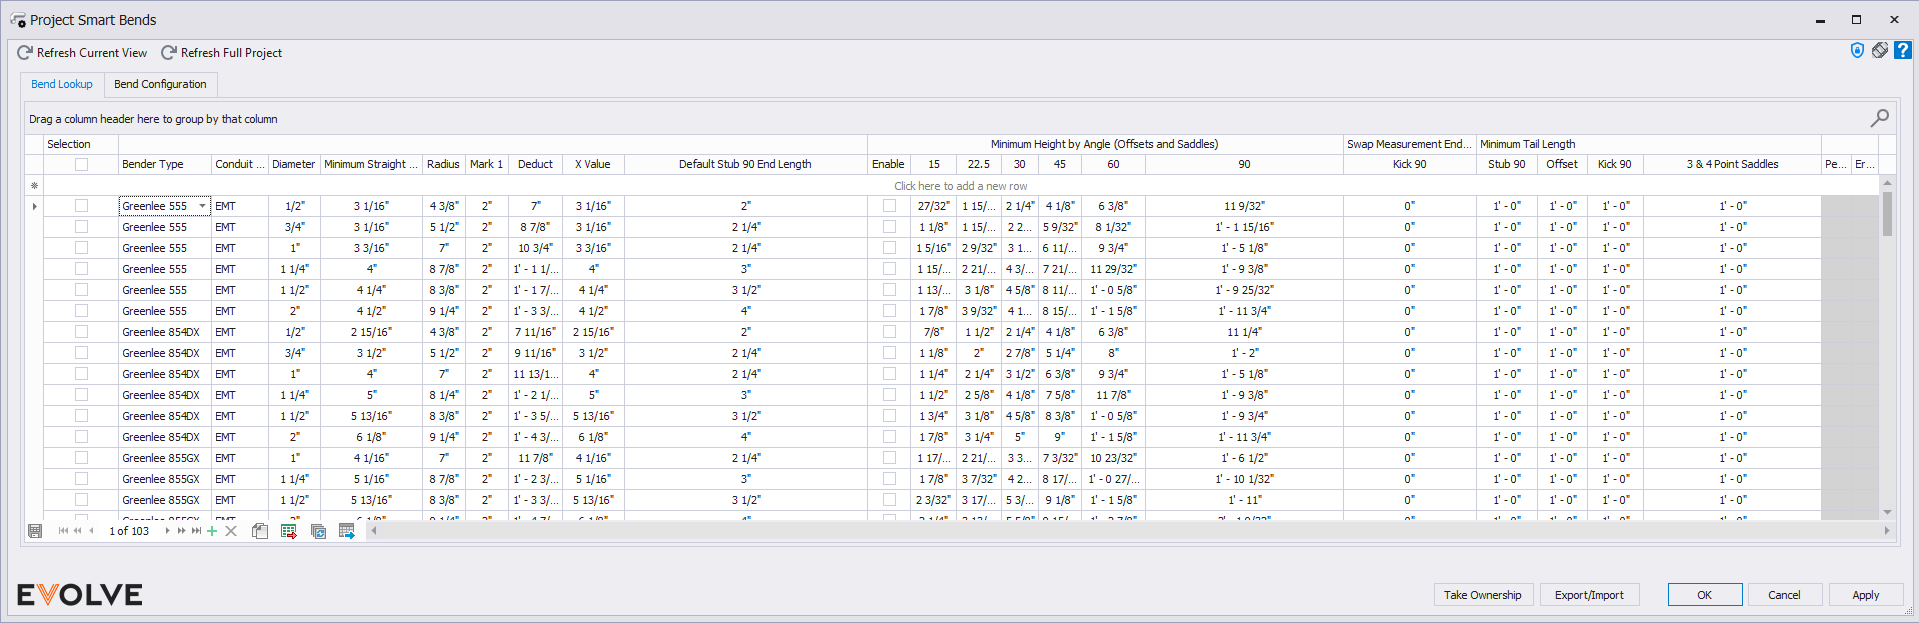
Bend Lookup Tab
When adding a Bender Type, the following values must be specified for each Diameter of each Conduit Type the desired bender can accommodate in order for eVolve to calculate the bends properly.
Column headers and groups
- Bender Type - used to define the make and model of the conduit bender.
- Conduit Type - used to identify the conduit's material classification.
- Diameter - used to define the conduit's width measurement.
- Minimum Straight Between Bends - used to define the smallest acceptable straight length of conduit between the two bends.
- Radius - used to define the desired bend radius
- Mark 1 - the minimum distance a bend can start from the end of a conduit.
- Deduct - the amount subtracted from the desired total stub length minus the Mark 1 value.
- X Value - only applies to offset bends and is used to calculate the Mark 1 value.
- Default Stub 90 End Length - used to define the standard length of a stub 90 from the end of the bend curve to the end of the bend.
- Minimum Height by Angle (Offsets and Saddles) group - if the group's Enabled column is checked, can be used to define the smallest acceptable height depending on the degree of the bend.
- Swap Measurement End Threshold - for Kick 90's, if the tail length is less than or equal to this value, then Mark 1 is measured from the tail end. Otherwise, Mark 1 is measured from the nose end.
- Minimum Tail Length group - used to define the smallest acceptable length of conduit on the tail end of the bend.
- Pending Action - displays any unresolved executions.
- Error Message - will inform if there's been an error within the row
Record Navigator buttons
- Add - used to add a new row to the grid.
- Delete - used to delete selected row(s).
- Duplicate - used to duplicate selected rows.
- Export Grid - exports the grid as currently displayed to Excel.
- Bulk Update - allows for the values in multiple selected rows to be revised at once.
- Send to Data Tables - send all displayed columns and their values to Data Tables.

Bend Configuration Tab
In Bend Configuration, different benders can be applied to various diameters of multiple conduit types. When modeled, the bends for each type will automatically be created using the assigned bender data.
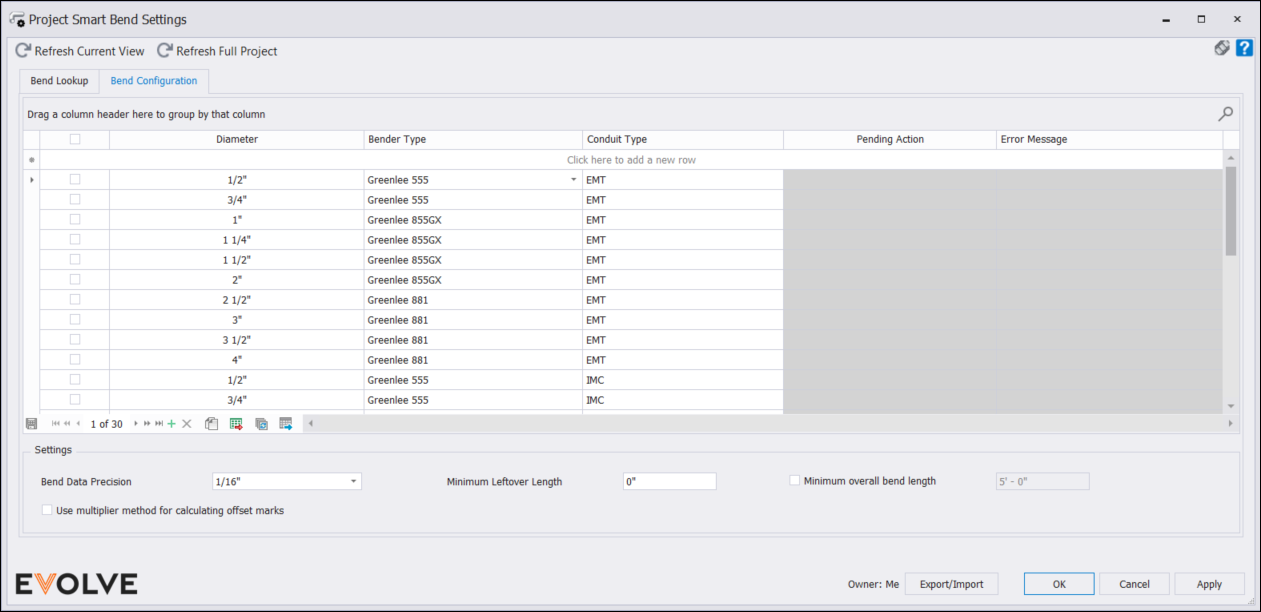
Column headers
- Diameter - used to define the conduit's width measurement.
- Bender Type - used to define the make and model of the conduit bender.
- Conduit Type - used to identify the conduit's material classification.
Settings panel
- Bend Data Precision menu - this option changes the returned precision of the bend information parameters. By increasing the precision, eVolve rounds the bend information parameter values to the nearest value set.
NOTE: This feature does not impact the modeling aspect of the bend family, only the reporting values. Therefore, based on the precision selected, the modeled bend families may not match the reporting values exactly. - Minimum Leftover Length field - when using the Optimize Bend - Consume Adjacent and Optimize Bend - Consume Selected End features sets the minimum length a conduit straight can be reduced to. Setting this value to 0 will consume as much of the conduit straight length as possible based on the selected Smart Bend.
- Minimum Overall Bend Length field - when enabled, populates a warning "Overall bend length below threshold." within the eE_ConduitBend_Warning parameter when the overall length of a bend is shorter than the value specified.
Record Navigator buttons
- Add - used to add a new row to the grid.
- Delete - used to delete selected row(s).
- Duplicate - used to duplicate selected rows.
- Export Grid - exports the grid as currently displayed to Excel.
- Bulk Update - allows for the values in multiple selected rows to be revised at once.
- Send to Data Tables - send all displayed columns and their values to Data Tables.

Tips and Tricks
- NOTE: The location of the bend information for benders is typically in the bender manual, on the bender itself, and on the manufacturer's website. We have included the manuals for the benders that are shipped with eVolve in the eVolve resource folder.
Program Files\eVolve\eVolve Electrical for Revit "xxxx"\Resources\Content\Product Data\Conduit Bends
