Defining a Custom Library
![]() Updated 1 year ago
by
Kerry Poe
Updated 1 year ago
by
Kerry Poe
Defining a Custom Library
This Create Definition File function generates a .xlsx and .xml file using the file structure to organize content. The folder name(s) within the directory containing the .xml are used as the family's category and any sub-folder(s) are used as the family's sub-category. After the definition files are created, the .xlsx file can be modified to update/change parameter values to help sort/organize content within the grid and add different images for family types if applicable.
Prerequisites
Folder structure containing all content(.xml, .xlsx, .rfa, and .png files), see below for folder structure suggestions.
Creating a library from a folder structure
- If the eVolve Family Browser is not already displayed, from the eVolve ribbon, in the Utilities panel, click Family Browser.
- From the eVolve Family Browser, click the Settings button.
- From the Library Configuration window, verify the path in the Custom Library Location dialog is correct and click the Create Definition File button.
- From the Create Definition File window, select the desired option and click OK.
- Use root folder name - the Sub-Category will only display the name of the folder containing the .rfa files.
- Concatenate folder names with separator - if the .rfa file is contained within multiple sub-folders, the folder names are stringed together and used as the family's Sub-Category name.
- From the Please Confirm window, if the displayed path is correct, click Yes.
- From the Build Library Definition File window, enter or select an existing name in the Target File Name menu and click OK. The .xlsx file is generated.
- From the Notice window, click OK.

Adding a custom library to a workstation
The instructions below assume the XML file exists.
- If the eVolve Family Browser is not already displayed, from the eVolve ribbon, in the Utilities panel, click Family Browser.
- From the eVolve Family Browser, click the Settings button.
- From the Library Configuration window, click Browse and navigate to the folder containing the desired .xml.
- From the Library Configuration window, click Create Library.
- From the Source Content Library Definition file window, select the desired .xlsx file and click OK. The Excel file is converted into a .xml file.
- From the Custom Content Library Configuration window, click OK.

To generate the Excel (.xlsx) file through a Revit project
To easily create a list of all families and types, a Revit project containing an instance of each family and type is required. The following steps will create a text file containing columns and automatically populate the rows with information to create the custom library .xlsx file. The exported text file(.txt) may be opened in excel and then saved in the .xlsx file format. While the Family and Types are automatically pulled from their respective .rfa files, the eVolveCategory, eVolveSubCategory, and Manufacturer shared parameters must be added to the project or families in order to populate the rows.
- While in a project, from the Project Browser in the Schedules section:
- For eVolve Electrical, go to Schedules/Misc - eE_Library Export.
- For eVolve Mechanical, go to Schedules - Library Export.
- From the ribbon, click File, click Export, click Reports, and click Schedule.
- From the Export Schedule window, navigate to the desired location to save the file, specify a name in the File Name dialog box, and click Save.
- From the Export Schedule window, select desired options and click OK.
NOTE: The Library Export schedule is contained within each product's model template located in:
- eVolve Electrical - C:\Program Files\eVolve\eVolve Electrical for Revit 20xx\Resources
- eVolve Mechanical - C:\Program Files\eVolve\eVolve Mechanical for Revit 20xx\Resources

Folder Structure Suggestions
Suggested folder structure Option #1
- Custom Library - folder contains .xml, .xlsx, and the Content folder
- Content - folder contains the All_Families folder
- All_Families - contains all .rfa and .png files
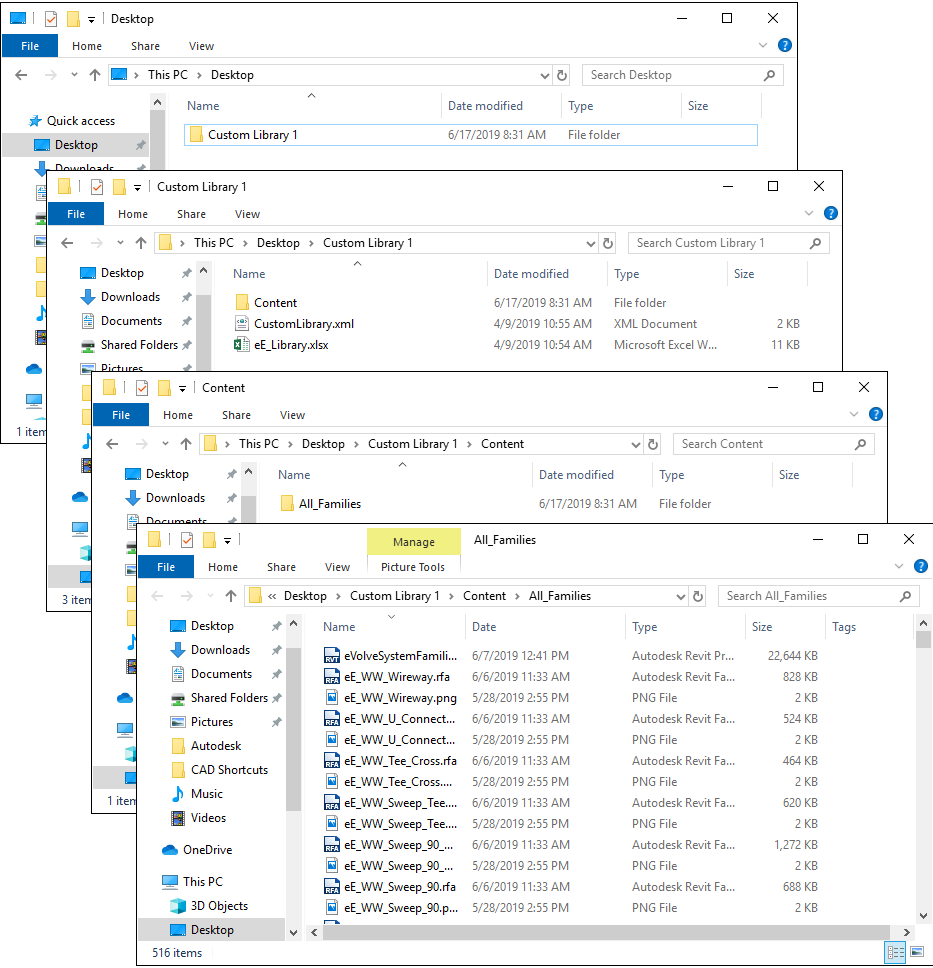
- Content - folder contains the All_Families folder
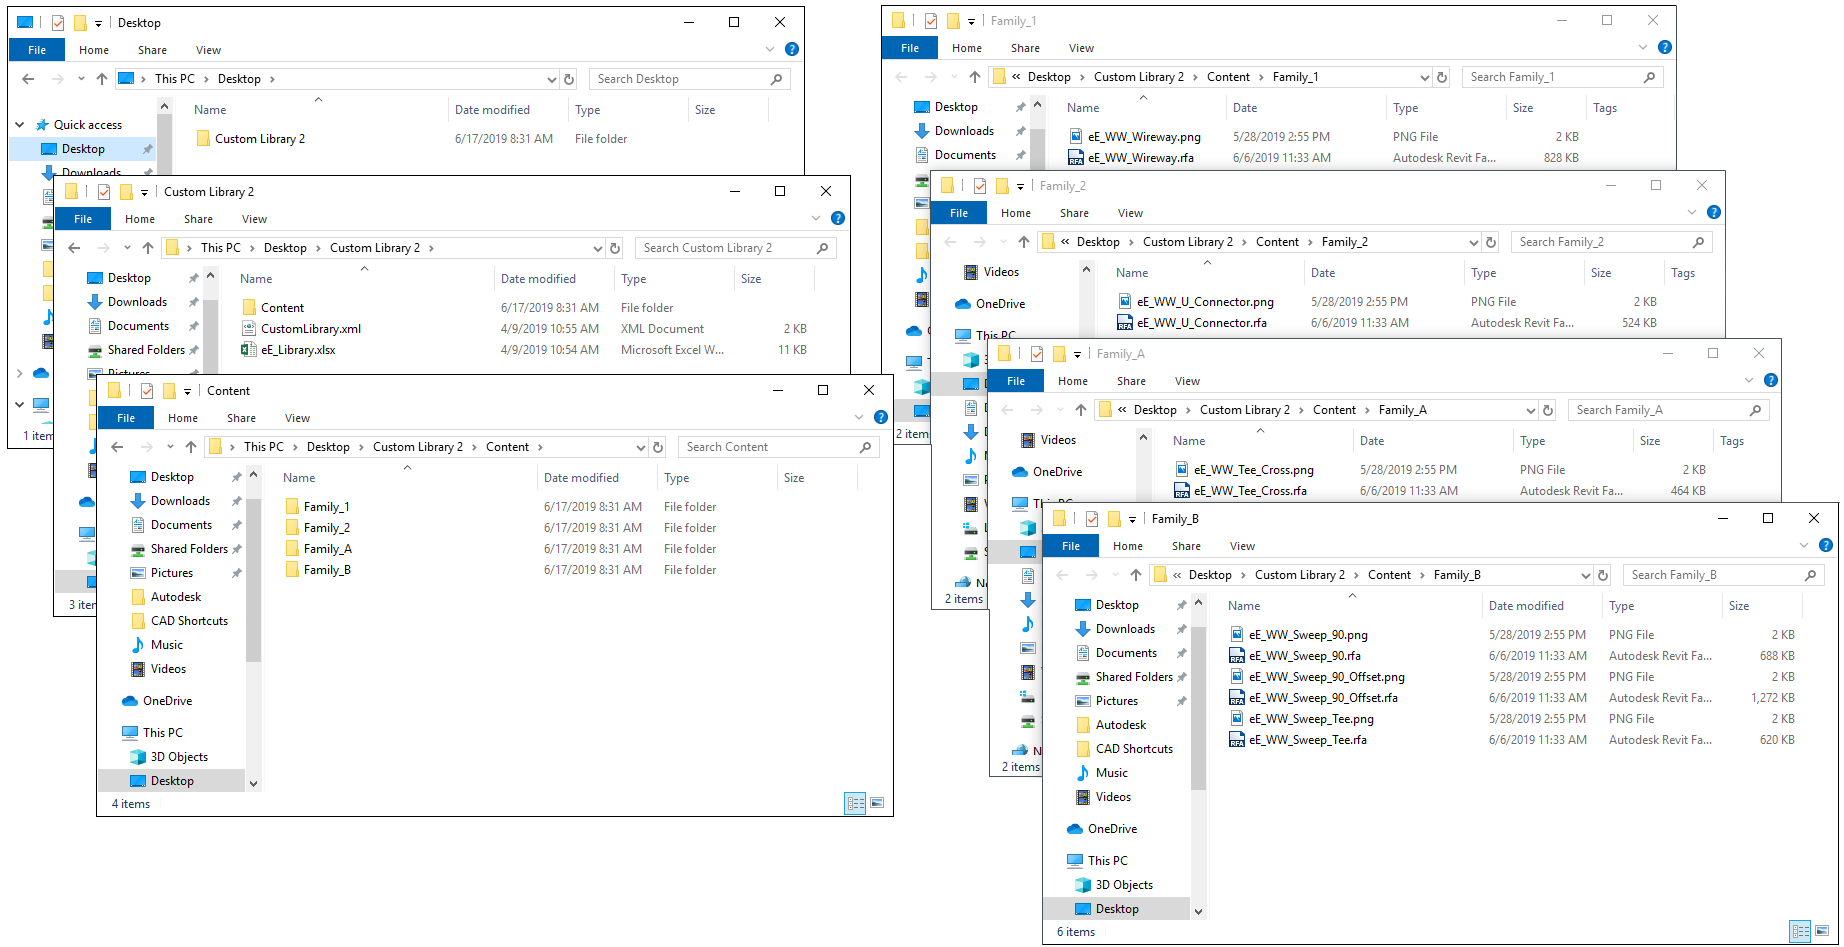
Suggested folder structure Option #2
- Custom Library - folder contains .xml, .xlsx, and Content folder
- Content - folder contains .xml, .xlsx, Family_1, Family_2, Family_A, and Family_B folders
- Family_1 - contains all .rfa and .png files
- Family_2 - contains all .rfa and .png files
- Family_A - contains all .rfa and .png files
- Family_B - contains all .rfa and .png files
- Content - folder contains .xml, .xlsx, Family_1, Family_2, Family_A, and Family_B folders
NOTE: Folder names do not need to match the folder names in the suggested folder structures above.

Defining a custom image
The Family Browser can display different images for each family type to quickly identify the desired card within the grid. The .xlxs file can be modified, adding the image path specified entries. The image files can be stored with the family files or in different locations within the defined Custom Library Location.
Modifying the Excel (.xlsx) file
- After creating a definition file, navigate to the Excel (.xlsx) file.
- From Excel, insert a new column titled CustomImage. Make sure the name is spelled correctly and there are no spaces.
- From the Excel file, in the CustomImage column, navigate to the desired row(family type) where you would like a custom image displayed.
- Add the file path to the desired image as if you are drilling down to the image file, starting at, but excluding the folder containing the Excel (.xlsx) file, and record the path to the image file. See the example below.
- Repeat until all desired types have the necessary image paths.
- Save the Excel file.
Example
- The Excel file resides in C:\Temp\Custom Library
- The image file resides in C:\Temp\Custom Library\Families\eVolve\Custom Images
- The CustomImage path is Families\eVolve\Custom Images
TIP: If the CustomImage path is blank, the image file must reside in the same folder as the RFA in order to be displayed.
Deploying the new library
- From the eVolve Family Browser, click the Settings cog.
- From the Library Configuration window, click Create Library.
- From the Source Content Library Definition file window, select the proper .xlsx file and click OK.
- From the Notice window, click OK.
- Close the Library Configuration window.
- From the Restart Required window, click OK.
- Restart Revit.

Excel Template break-down
IMPORTANT: The Family name and Type displayed in the Excel file must match the Family and Type displayed in the .rfa file.
Custom libraries are defined in an Excel file (.xlsx) and must contain the following headings:
- Family - row value must match Family name contained within .rfa file.
- Type - row value must match Type contained within .rfa file.
- eVolveTypeDisplay - Optional field. The cell value will display on the card, if a value is not specified, the card will display the cell value of the Type column.
- File Path - row value equals the main root folder containing all content.
- CustomImage - used to define the path to an image file.
- eVolveCategoryId - row value equals the shared parameter the family is grouped by.
- eVolveSubCategoryId - row value equals the shared parameter the family is grouped by.
- eVolve_UnitofMeasure - row value equals the shared parameter the family is grouped by.
- Manufacturer - row value equals the shared parameter the family is grouped by.
- Model (optional) - currently not utilized
- eVolve_Hardware_Finish - Optional searchable field.
- eVolve_Hardware_Size - Optional searchable field.
- eVolve_Hardware_Type - Optional searchable field.
- Custom1 - user-defined value, see the Library Configuration article for more information.
- Custom2 - user-defined value, see the Library Configuration article for more information.
- Custom3 - user-defined value, see the Library Configuration article for more information.
- Custom4 - user-defined value, see the Library Configuration article for more information.
- Custom5 - user-defined value, see the Library Configuration article for more information.
NOTE: Each Family and Type must be listed separately in the .xlsx file
TIP: Once the Excel file is created, the cell values may be modified to customize the filter/group/sort/search parameters.
Click the following link to manually populate a blank template - custom-library-template.xlsx
