Quick Dimensions
Quick Dimensions

Summary
Creates dimensions between selected system elements and/or element edges.
- eVolve tab ⮞ Quick Tools panel ⮞ Quick Dimensions button


Usage
- From the EVOLVE ribbon, in the Quick Tools panel, click Quick Dimensions.
- From the drawing area, select the desired elements to annotate, then click 'Finish' from the Options Bar.
NOTE: Selected elements must be parallel - From the drawing area, click the background at the desired location to place the dimension handle.
NOTE: The Quick Dimensions predefined selection filter can be modified via the Selection Configuration. Please see the link in the Relevant Articles below.

Window Overview

- Dimension Style panel
- Family menu - used to display and select available families.
- Type menu - used to display and select available family types.
- Dimension Method panel
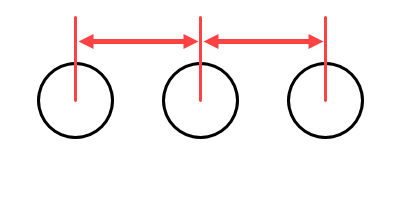
- Center-to-Center radio button - dimensions to the center point of all system family elements.

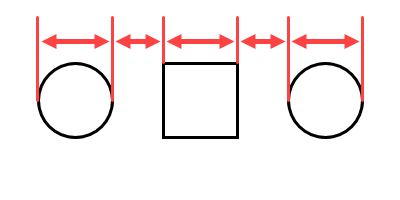
- Edge-to-Edge radio button - dimensions to the edges of system families.

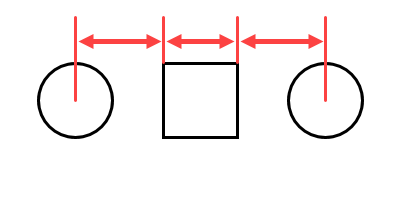
- Center-to-Edge radio button - dimensions to the center point of round system families and the edges of non-round system families.

- Center-to-Center radio button - dimensions to the center point of all system family elements.
- Options panel
- Select Element Edges checkbox - when enabled, allows the selection of edges of modeled elements after the initial selection is made.
- Select Linked Model checkbox - when enabled, allows the selection of linked model elements.
- Prompt for Handle Position checkbox - When enabled, allows specifying the position of where dimension handles will be drawn.
- Maximum Elements selector - defines the maximum allowed elements in one dimension.
- Continuous dimensioning checkbox- when enabled, this feature remains active until canceled by the user.

Tips and Tricks
- When dimensioning Cable Trays, the Add and Drop visibility options must be turned off for the Edge-to-Edge dimensions to work. Otherwise, Cable Trays are dimensioned Center-to-Center.

