Connect Offset

Connect Offset

Summary
With Connect Offset, you can quickly connect two parallel elements with an offset.
- eVolve Electrical tab ⮞ Quick Tools panel ⮞ Connect Offset button


Limitations
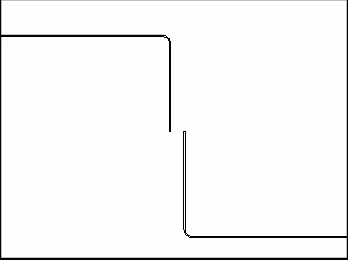
- Runs must be parallel or undesirable results may occur.
- The stationary run(s) are not modified, their endpoints remain in the same location throughout the entire process.
- The connecting run(s) is trimmed or extended to meet the calculated intersection point unless it affects elements downstream, then the command is canceled.
Usage
- From the eVolve Electrical ribbon, in the Quick Tools panel, click the Offset menu and select Connect Offset.
- From the Connect Offset window, confirm the Target Angle value by clicking OK or specify a new angle, then click OK.
- From the drawing area, select the stationary element (the run), then click 'Finish' from the Options Bar.
- From the drawing area, select the element(s) to connect (the connecting run), then click 'Finish' from the Options Bar.

Window Overview
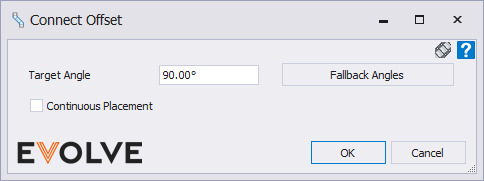
The Connect Offset window
- Target Angle input box - defines the initial angle that EVOLVE will use when attempting to create an offset. If the offset cannot be produced with the current modeled constraints and additional angles exist ("fallback angles"), then EVOLVE will attempt to create the offset using the angles listed in the "Fallback Angles" list.
- Fallback Angles button - used to edit the list of "fallback angles" the feature may use.

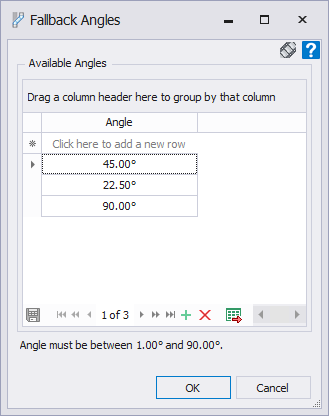
The Fallback Angles window
The Fallback Angles window allows for specific angles to be added to the Available Angles list. If the requested offset cannot be produced at the desired Target Angle and if the Available Angles list is populated with angles less than the Target Angle, then EVOLVE will cycle through the list of angles until it finds an angle in which the offset can be produced.
Adding an angle
From the grid, click into the top row and start typing, or from the Data Navigator located at the bottom of the grid, click the Add new button 
Deleting an angle
From the grid, select the row containing the desired angle, then from the Data Navigator located at the bottom of the grid, click the Delete Selected button 

Tips and Tricks
EVOLVE will attempt to offset elements with the following constraints:
- The element must belong to the following Revit categories:
- Cable Tray
- Conduits
- Ducts
- Pipes
