Data Profiles


Summary
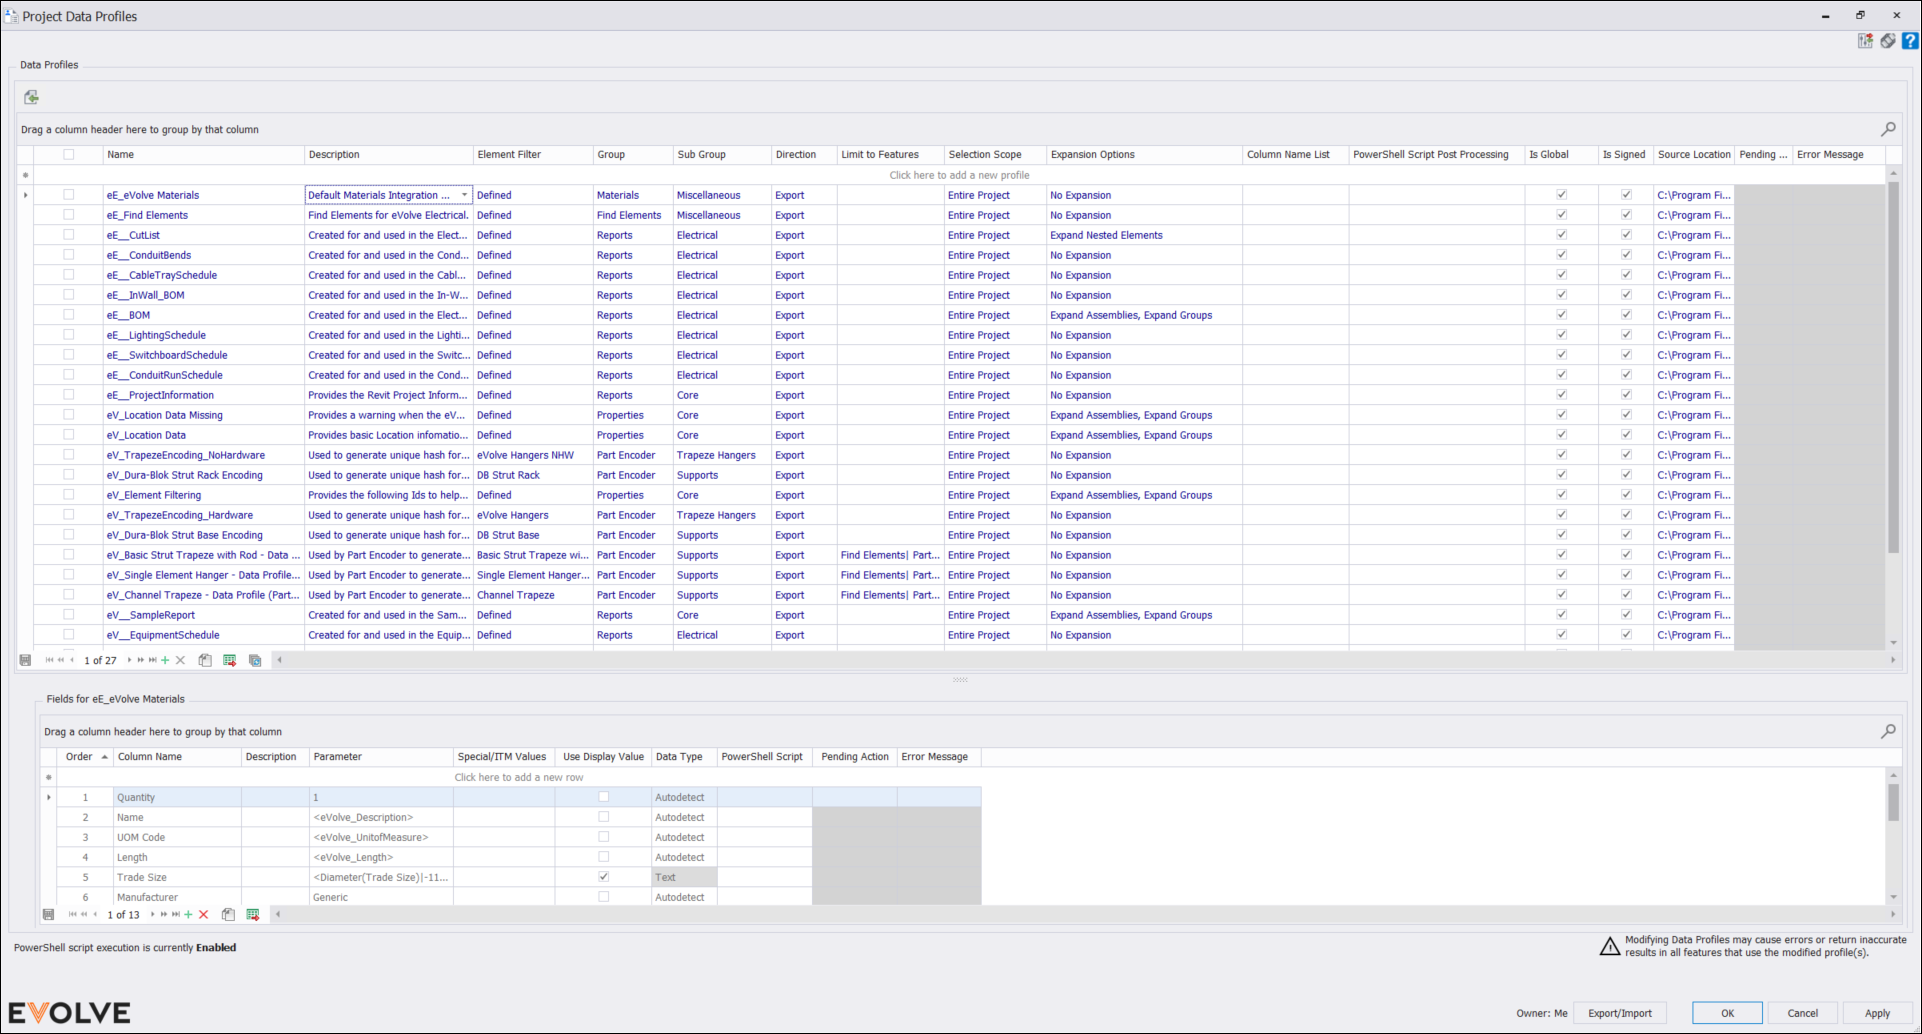
A data profile allows select parameter values to be read from or written to elements adhering to a defined element filter and selection scope. Data Profiles are used in various areas in eVolve, such as the eVovle Properties Browser, Reports, Find Elements, Part Encoder, CSV Data Exchange, etc.
- eVolve tab ⮞ Utilities panel ⮞ Data Profiles button


Prerequisites
Usage
Creating a Data Profile
- From the eVolve ribbon, in the Utilities menu, click Data Profiles.
- From the Data Profiles window, in the Data Profiles grid, select a cell from the Click here to add a new row and specify the following:
Required
- Name - the name does not have to be unique as you may utilize Description, Group, and Sub Group to distinguish it from other profiles.
- Element Filter - the element filter must be defined.
Optional
- Description - blank if left undefined.
- Group - blank if left undefined.
- Sub Group - blank if left undefined.
- Direction - the default value is Export if left unchanged.
- Selection Scope - the default value is Entire Project if left unchanged.
- Column Name List - the default value is No Expansion if left unchanged.
- Once the necessary information is added, click Apply. The row is added and the Fields for grid is active.
- From the Fields for grid, in the Record Navigator, click the Add New button. A new row is added to the grid and the Parameter menu is populated with parameters from the element filter.
- From the newly created row, in the Parameter cell, click the menu, and select the desired parameter.
- From the newly created row, specify a Column Name.
- Optionally define the Order, Description, Use Display Value option, and/or add a PowerShell Script.
- Once the necessary information is added, click Apply.
- Repeat step 4 to continue adding parameters to the data profile, once complete click OK.

Import Data Profiles
IMPORTANT: this feature was deprecated as of v6.2 and will be removed in a future release; please use the Configuration Exchange feature to import reports.
The Import feature allows exported Data Profiles to be saved to a project.
NOTE: currently, when importing data profiles the associated data table(s) are not included and must be imported separately. As a best practice, if a data profile has additional components like a Data Table, import the additional components first.
Importing Data Profiles
- If applicable, from Utilities/Data Tables, import the associated data table.
- From Utilities/Data Profiles, click Import Profile.
- From the Import Profile window, navigate to the required profile(s) for the desired report and click Open.

Window Overview
Tool Palette buttons for Data Profiles
- Import (Deprecated as of v6.2) - imports a report configuration file.
- Configuration Exchange - Used to import/export reports and their dependencies; please see the Configuration Exchange article for more information.
Grid Columns for Data Profiles
- Name - used to apply a label to a data profile.
- Description - used to provide additional information about the data profile.
- Group - used to assign a category/type to a data profile.
- Sub Group - assigns a subset of a group/category to a data profile.
- Element Filter - used to define the categories and optional conditions that elements and their parameters are filtered against.
- Direction - used to define the parameter value is used. For example, select Export if the parameter value is displayed in a report, the eVolve Properties Browser, or the View Data panel. Select Import if the parameter value is written to a file like the CVS Data Exchange feature. When exporting, parameter names must contain <> brackets. When importing, parameter names cannot contain <> brackets.
- Limit to Features - defines which features may access the selected Data Profile.
- Selection Scope - defines the range/criteria in which the element filter is run.
- Entire Project - Runs the element filter against all elements in the model. Nested or contained elements (assemblies, groups, or nested families) are evaluated individually because they exist in the project, even if their container doesn’t pass.
- Active View - Runs the element filter against only elements visible in the current view. Nested or contained elements are still evaluated if they appear in the view.
- Current Selection - Runs the element filter only on elements currently selected in Revit. If a selected container (assembly, group, or family) fails the filter, its nested elements are not evaluated or expanded.
- See the Tips and Tricks section for more information.
- Expansion Options - defines whether or not eVolve will further inspect elements such as assemblies and groups to obtain parameter values that are otherwise unavailable at the "container" level.
- Expand Assemblies - when checked, elements within assemblies adhering to the element filter are displayed.
- Expand Groups - when checked, elements within a group adhering to the element filter are displayed.
- Expand Nested Elements - when checked, nested elements within a host element adhering to the element filter are displayed.
- Ignore Filter Conditions - when enabled, nested items or items in an assembly or group are returned regardless of the filter conditions.
- Exclude Container - when checked, only elements within assemblies adhering to the element filter are displayed, and the assembly itself is omitted from the results.
- Column Name List - optional, defines required fields to be mapped when using a specific integration.
- PowerShell Script Post Processing - this runs after all other processing and can be used to make final adjustments to the data being returned.
- Is Global - specifies if this entry is defined within a global configuration. When this is set, the respective entry is read-only.
- Is Signed - specifies if this entry has been verified as secure and is allowed to execute fully (if enabled) regardless of user settings.
- Source Location - displays the location of where this entry is sourced from.
Record Navigator button for Data Profiles
- Add - used to add a new row to the grid.
- Delete - used to delete selected row(s).
- Duplicate - used to duplicate selected rows.
- Export Grid - exports the grid as currently displayed to Excel.
Grid Columns for Fields For
- Order - defines the sequence in which parameters are displayed in features like the eVolve Properties Browser and View Data.
- Column Name - defines the display name/friendly name of the parameter.
- Description - used to provide additional information about the parameter.
- Parameter - defines the parameter used in the data profile.
- IMPORTANT: All parameter values sent from Data Profiles are string values regardless of the original type in Revit
- The menu's parameters depend on the categories and optional conditions selected in the element filter.
- While only parameters common to all selected categories are displayed in the menu, the parameter name or Id may be entered even if it is not displayed.
- When manually entering, the parameter name or Id should be enclosed in <>; for example, the parameter name for "Comments" should be added as <Comments>, and the Id should be added as <-1010106>.
- A PowerShell script may be run on parameter values; However, omitting the <> symbols when entering the Parameter name essentially creates an on-demand parameter that returns the calculated value of a PowerShell script. For example, entering eVolveVersion for a Parameter name and adding the following PowerShell script - return $eVolveVersion returns the current eVolve version, which may be displayed in reports, the eVolve Properties Browser, etc. without having to create a Shared or Project Parameter.
- To optimize the return time and ensure localized translations are correct, use the parameter's Revit Id instead of the parameter name or selecting the name from the list.
- The Id values for standard Revit parameters are negative, while custom parameters are not. For example, the parameter's Revit Id for "Comments" is (-1010106) while the Id for "eVolve_CustomId" is (839445).
- The parameter's Revit Id can easily be obtained via the Revit Lookup Tool (an externally developed tool not supported by eVolve).
- Use Display Value - defines whether the internal Revit value or the display value is used.
- Special/ITM Values - conditional values which are not available via parameters but can be included within results. Internal logic resolves these values and may alter the results by including additional data rows.
- Data Type - Specifies the data type this column is expected to hold.
- PowerShell Script - allows a PowerShell script to run against the parameter value.
IMPORTANT: PowerShell must be set to Always Enable in Workstation Settings.- PowerShell script(s) may increase return times as each PowerShell script contained in the data profile runs on every element that meets the criteria defined in the element filter.
Record Navigator button for Fields For
- Add - used to add a new row to the grid.
- Delete - used to delete selected row(s).
- Duplicate - used to duplicate selected rows.
- Export Grid - exports the grid as currently displayed to Excel.

Tips and Tricks
Limiting Data Profiles to one or multiple features
A single data profile may be used across multiple features. A data profile designed for a report can be used in the CSV Data Exchange, EVOLVE Properties Browser, or Find Elements. However, you may want to see different information displayed from feature to feature. For instance, you may have the fields in a report's data profile to only return the internal Revit value, as it's better to transform the raw values in the report. Still, displaying the internal Revit value may make some fields more challenging to read/understand. The value displayed may be a decimal when ft/in is expected, or an id is displayed instead of the actual name. In those cases, you should modify the data profile and check the 'Use Display Value' checkbox. Although, doing that could break the report, especially if the parameter is used in one or more of the report's calculated fields. A best practice tip is never to make on-the-fly modifications to a working data profile; instead, you should duplicate the data profile, modifying one copy to 'Use Display Values' and the other to not. You may want to do this for each report's data profile. Now, you've got twice the number of data profiles. While this is expected in the manager, when you (or someone else) are in a feature, you don't want a data profile to be accidentally modified. This is where 'Limit to Features" comes in. Limit to Features allows you to control the data profiles users may access from a given feature.
NOTE: If no action is taken, the EVOLVE application will continue to work as it's always worked. However, if you would like to limit specific data profiles to specific features
To limit a data profile to a feature
- From the EVOLVE ribbon, in the Utilities panel, click Data Profiles.
- From the Data Profiles window, in the Data Profiles grid (the top grid), click the Limit to Feature menu and check the desired feature(s) to associate the data profile with, then click OK. The data profile is now limited to the selected feature(s).
Select All vs leaving the field empty
Leaving the 'Limit to Features' field empty implicitly tells EVOLVE that all current and future features may utilize the selected data profile; this is how the application works today (pre-7.4 release). Think of the 'Select All' checkbox as a quality of life function; it selects all the options in the list, so you don't have to. Clicking a feature's checkbox explicitly tells EVOLVE that the selected data profile(s) may utilize a feature. So when the 'Select All' checkbox is clicked, it's telling EVOLVE the data profile may only be utilized by these selected features.

Selection Scope
The Selection Scope defines where the Element Filter looks for elements when a Data Profile runs. It controls whether the filter is applied to the entire model, a view, or only the elements currently selected.
Why Results Differ
Results may vary when using Current Selection instead of Entire Project or Active View because:
- With Entire Project and Active View, nested elements exist independently in the model or view and are evaluated directly.
- With Current Selection, only the selected container is checked; its nested elements are ignored unless the host passes the filter.
Interaction with Expansion Options
Expansion Options (Assemblies, Groups, Nested Elements) only apply when the container element is in scope. If Current Selection is used and the host fails the filter, its contained elements are not expanded or compared.
NOTE: Expansion Options are most effective with Current Selection, allowing contained elements within the selected object to be included. However, they can also be useful with Active View or Entire Project to ensure nested elements appear in model-wide or view-based reports — though this may increase processing time.
Multiple Column Sourcing Scripts
- This becomes useful where complex calculations are involved as it allows for setting multiple values at once so that calculations/conditions do not need to be duplicated for each column. For example, a
forloop can be used to set multiple values at once. - Upfront, this requires PowerShell to accomplish as the return is a "complex type" which maps a column name to its respective value. Supported return types (from PowerShell) are:
Hashtable: defined in script like:$data = @{ }OrderedDictionary(for cases where column order matters): defined in script like:$data = [ordered]@{ }
Consider this basic example which will result in a Comments and Mark column with "augmented" values:
# This initializes an ordered key/value pair structure.
$data = [ordered]@{ }

# Add column names as the key and assign the target value.
# Since an ordered structure was defined, the columns will be in the order they are added.
$data["Comments"] = "Hello world: " + $eVolveElement.LookupParameter("Comments").AsString()
$data["Mark"] = "PowerShell wuz here:" + $eVolveElement.Id.ToString()

# Return type is expected to be the structure itself.
return $data
- Of course, an unlimited number of columns and more complex logic can be added to perform multiple calculations when assigning values - it's PowerShell after all.
Duplicate Column Definitions
- It is is possible for the user to define the same column name multiple times (either in script output and/or as an explicit/traditional definition). When then happens, the last entry result is always used.
- For example, in the snip above imagine a traditional field entry for
Commentsis defined before an entry where this script is used. When then happens, the result of the script will be the result of the Comments field. Conversely, ifCommentsentry is defined after the entry where this script is used then the result of the dedicated entry will be used.
- For example, in the snip above imagine a traditional field entry for
- A new column is available (hidden by default) in the Fields grid, Multiple Column Sourcing, which is simply a checkbox. When this value is checked:
- It signifies the field uses this alternate processing method
- PowerShell Script is required to be provided
- Column Name is ignored (and not required to be provided) as the script result defines the target parameters
- PowerShell Script Tester
- A new Return Type entry (the selection box in the bottom right) is available for Data Profiles: Multiple Column Sourcing which allows the user to enter a script, select the target element, and see the results of what this processing engine would do.
Videos
Data Profiles

Relevant Articles
- Creating an Element Filter
- PowerShell Script Window
- Using grids in the eVolve software
- Record Navigator
- Searching in grids - using the Find feature
- Save Grid States
- Configuration Exchange
- Data Profiles
- Dynamic Values

Integration Profiles (Legacy Feature)
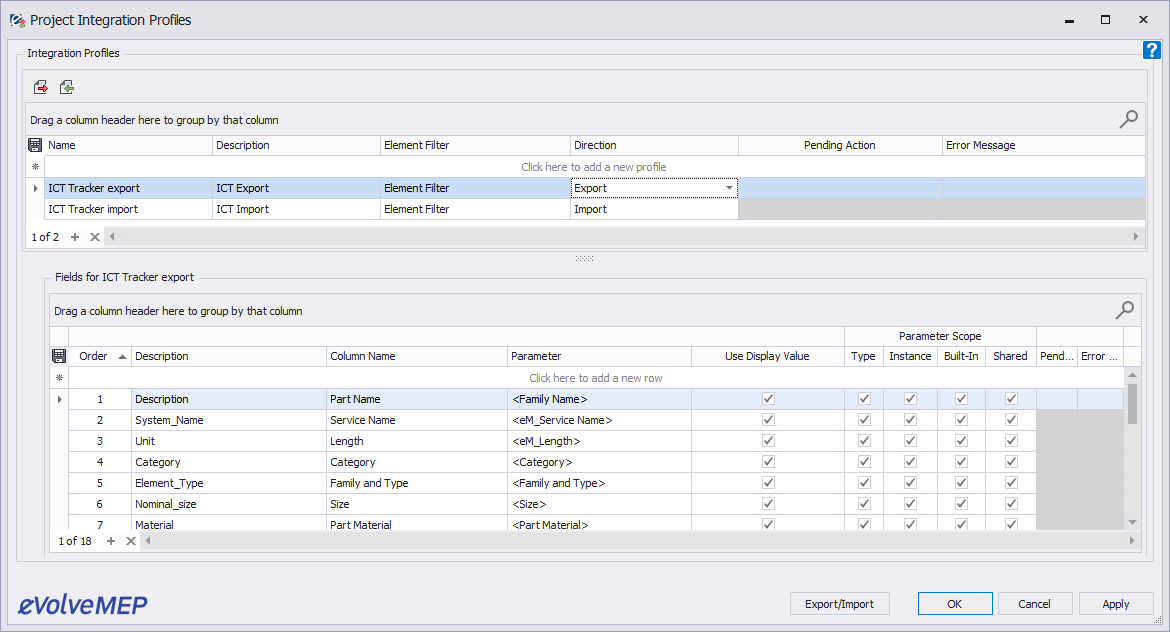
The Integration Profiles feature allows for the creating and management of custom profiles to use with the CSV Data Exchange feature.
Feature Abilities:
- Create an Export or Import profile that contains the following: Profile name, description, element filter, and export direction
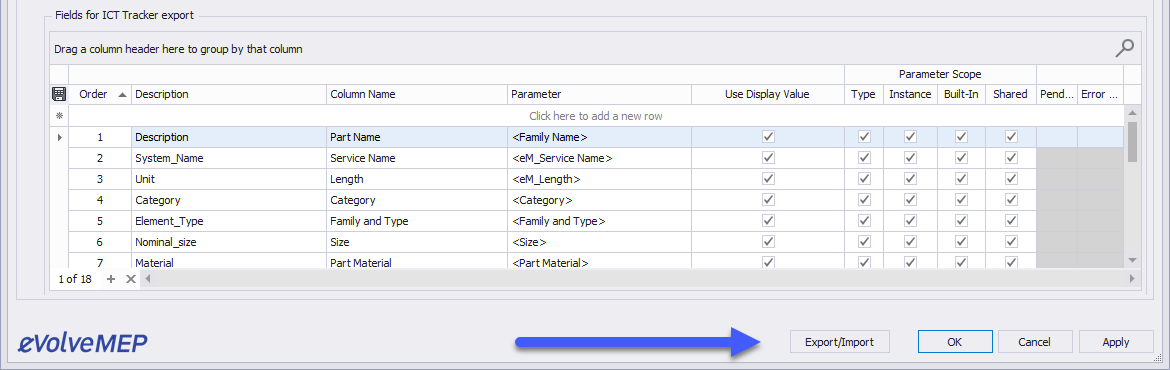
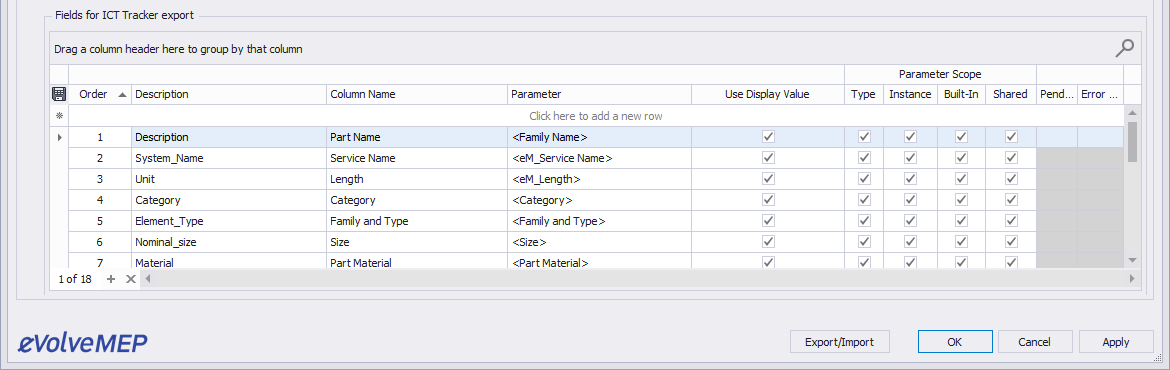
- Define the CSV file data, order, and options:
- Order - First column, second column, etc.
- Column Name - this will be the column header in the export or import
- Description - this is to help note the purpose of the column, but this field is not used in the CSV file itself.
- Parameter - This is the parameter name that contains the data to be exported or imported
- Use Display Value - provide the display value users see in Revit (e.g. 2' 6") or provide the raw/underlying value stored in Revit (e.g. 2.5)
- Parameter Scope: Allows for fine control over the respective Parameter. A checked selection indicates parameters of the respective scope are eligible. At least one option must be selected. The default is all values selected.Type will not be allowed as a selection for Import profiles.
How to use this feature
Export and Import Integration: These buttons will export the highlighted integration profile, including the CSV definition.

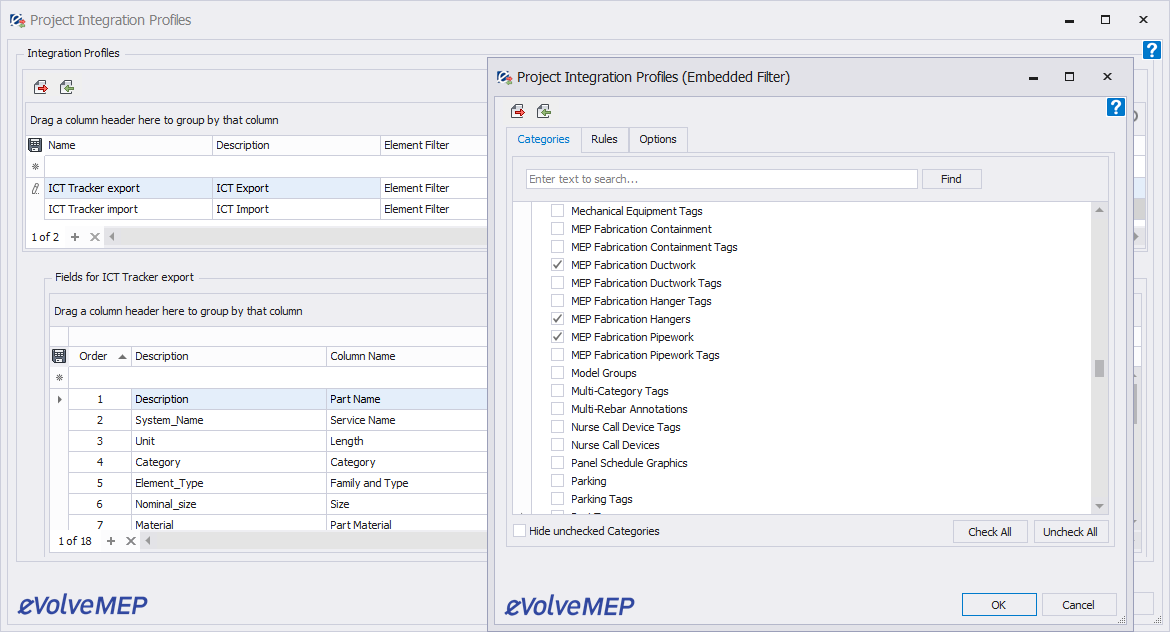
When creating an integration, it will also be necessary to define an element filter that provides the feature with criteria of which elements to search for. For example, Revit categories that the elements are on must be defined. However, parameter rules do not have to be defined. Defining them would be stating that the elements within those selected categories must also meet the parameter rule that was created.
With the Integration Profile highlighted, start to create the CSV fields for the export.
Be sure to save and test the export to confirm the parameter is working as expected.

This export/import option will export all of the integration profiles as well as their CSV definitions.