Route Cable
![]() Updated 1 year ago
by
Adam Heon
Updated 1 year ago
by
Adam Heon
Route Cable

Summary
Automatically routes and draws cable runs and creates data to apply to eVolve cable schedules.
- eVolve tab ⮞ Cabling panel ⮞ Route Cable button


Usage
- From the eVolve ribbon, in the Cabling panel, click Route Cable.
- From the Route Cable window, choose whether to Run at Ceiling Height or Offset Above Devices.
- Select a Cable type and click OK.
- In the project, click on the starting device then click the ending device.
- Repeat for additional runs or select Cancel to end the run.
- These runs can be drawn to and from, moved, and edited like standard drawn cable once loaded.

Window Overview
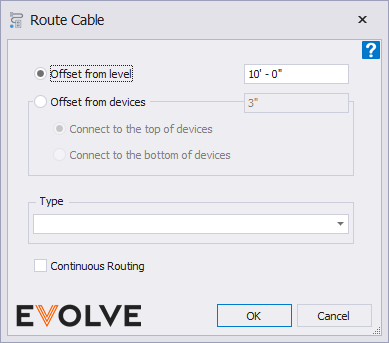
- Offset from level - Specify distance above the associated level to perform routing of cable starting from either the top or bottom of the selected in-wall devices.
- Offset from devices - Specifies the offset value from the devices to perform routing of cable with the following options:
- Connect to the top of devices
- Connect to the bottom of devices
- Type - displays the available types loaded in the model.
- Continuous Routing - When enabled, the Route Cable command remains active until the ESC key is pressed.

Tips and Tricks
- Default bend routing is parallel to the device mounting surface. To load an alternate routing, perpendicular to the device mounting surface, hold the Shift key when clicking the starting and ending device.
Best Practices
- While using the the auto-routing features, only specific families from the eVolve library can be used.
- For devices, under the In-Wall Rough category, use Assembly Type 1 and Assembly Type 2, with their multiple subtypes.
- For a panel, under the Equipment category, use the Panelboard Load Center family.
When creating families for the Cable Run feature, keep in mind that the auto-routing capabilities of the Route Cable feature are dependent on three main properties.
- Compatible types must have at least one cable connector attached
- A face node must be placed into the part.
- Prefix “eE_ASM_In_Wall_” to the beginning of each type name that is made to be used as a device with this feature.

Relevant Articles
- Start Cable
- Delete Cable
- Assign Cable
- Cable Schedule