Auto Route Settings
![]() Updated 1 month ago
by
Kerry Poe
Updated 1 month ago
by
Kerry Poe
Auto Route Settings

Summary
Auto Route Settings allows for control over how far a conduit run may extend from a pathway, what type and how much run spacing to apply and, how start and finish elements should be filtered and identified.
- eVolve tab ⮞ Resources panel ⮞ Settings menu ⮞ Auto Route Settings button


Prerequisites

Usage
- From the eVolve ribbon, in the Resources panel, click the Settings menu, then click Auto Route Settings.

Window Overview
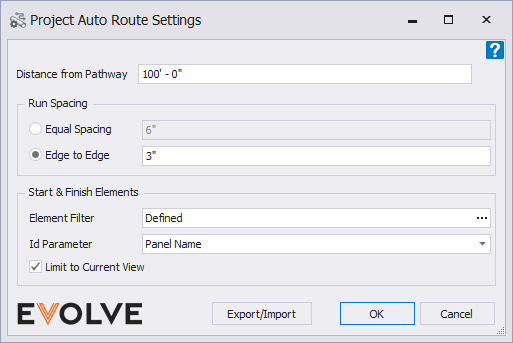
- Distance from Pathway - this value defines the maximum distance between the equipment from pathway that the feature will route to.
- Run Spacing panel
- Equal Spacing radio button - applies the specified spacing value based on the conduit's center line.
- Edge to Edge radio button - applies the spacing from the edge of one conduit to nearest edge of the next conduit.
- Start & Finish Elements panel
- Element Filter - defines what elements are valid start and end points for routing.
- Id Parameter menu - defines the parameter that contains the unique identifier for each Start and Finish element that matches the Conduit Run Schedule.
- Any Text type parameter may be utilized as long as the equipment elements contain the parameter, even if it does not appear in the drop-down menu.
- Limit to Current View checkbox - limits the selection of start and finish elements to only elements within the view.
