Conduit Run Schedule
![]() Updated 1 year ago
by
Adam Heon
Updated 1 year ago
by
Adam Heon
Conduit Run Schedule
The Conduit Run Schedule is designed to create, modify, and manage conduit run data. Schedule data can be entered manually or loaded from a pre-configured Excel file that is generated directly from eVolve to Excel. Once assigned, each run will appear on a Conduit Run Schedule in the Project Browser and can be assessed for several errors with the Error Check feature. The Conduit Run Schedule is also where the setup for System Colors resides.
Conduit Run Schedule/ Run Schedule tab
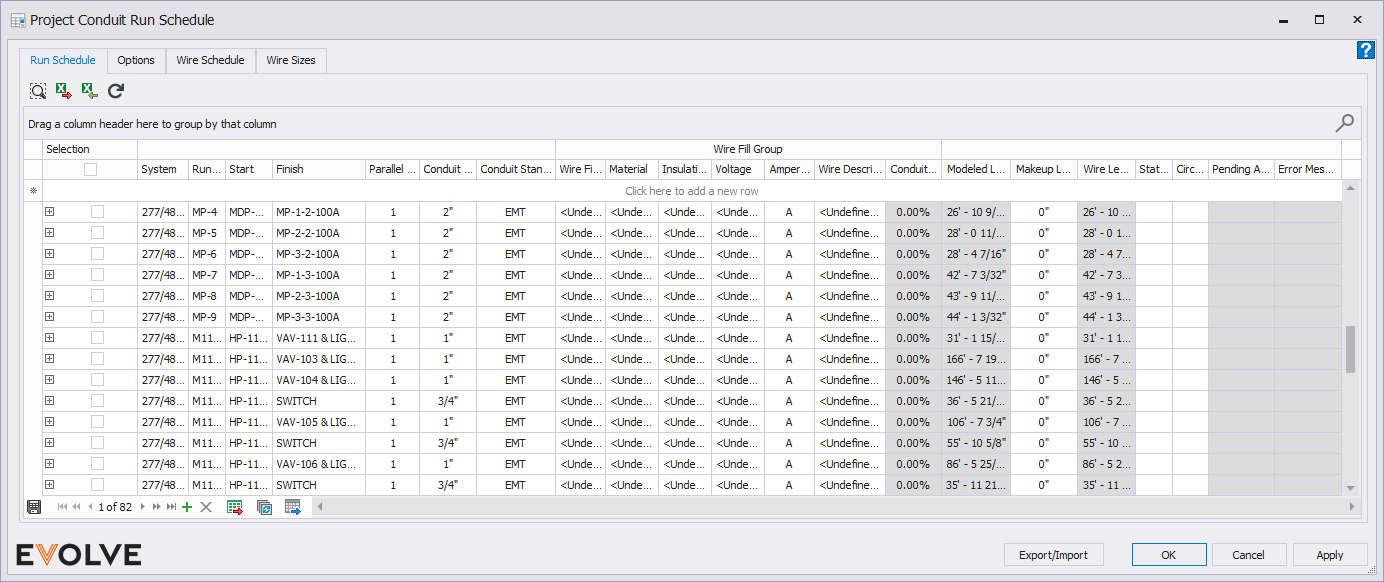
Tool Palette buttons
- Locate Element - Used to locate a single element in the model. If the selected element is in the currently active view, Locate Element will zoom to and display the element in fullscreen. If the selected element is not in the currently active view, Locate Element will allow Revit to find the element.
- Export to Excel - exports all data (including hide columns) in an Excel format (.xlsx).
- Import from Excel - imports data from an Excel (.xlxs) file.
- Load Runs - runs a query on the model, getting data that may have been added since the Conduit Run Schedule was opened.
Grid Columns
- Run Id - required, displays the user-defined run identifier.
- Start - used to define the Equipment Id where the run originates.
- Finish - used to define the Equipment Id where the run terminates.
- System menu - displays the systems defined in Options.
- Parallel Qty - used to define the number of parallel conduits in a run. The cell is automatically populated with a value of 1 if left undefined.
- Conduit Size menu - displays a list of available conduit sizes.
- Conduit Standard - displays a list of available standards for the project.
- Wire Fil Id menu - displays a list of available Wire Fill Id for the project.
- Material menu - displays a list of available material types for the project.
- Insulation - displays a list of available insulation types for the project.
- Voltage - displays a list of Revit's Distribution Systems.
- Amperage - displays the amperage associated with the Wire Fill Id.
- Wire Description - displays the phase, neutral, ground, and isolated ground wire size and quantity based on the Wire Fill Id specifications.
- Conduit Fill - Displays the wire and insulation fill percentage in the specified conduit type and size.
- Modeled Length - displays the wire length as currently modeled.
- Estimated Length - displays the approximated wire length defined by the user.
- Makeup Length - displays the additional wire needed in the run defined by the user.
- Installed Length - displays the actual length of wire used as defined by the user.
- Wire Length - displays the combined value of the Modeled Length plus the Makeup Length.
- Status - displays the current Status assigned to the run.
- Circuit - displays the circuit assigned to the run.
- Notes - used to add additional information regarding the run.
Record Navigator buttons
- Add - used to add a new row to the grid.
- Delete - used to delete selected row(s).
- Export Grid - exports the grid as currently displayed to Excel.
- Bulk Update - allows for the values in multiple selected rows to be revised at once.
- Export to Data Tables - sends the currently displayed content to a Data Table.
To Open the Project Conduit Run Schedule Window
1. From the eVolve Electrical ribbon, in the Conduit Data panel, click Conduit Run Schedule.
Creating a Conduit Run Schedule Manually
From the Project Conduit Run Schedule window, data can be manually entered as needed, with only a Run Id required to generate a schedule. Each run must have its own unique run id to generate a schedule.
Creating a Conduit Run Schedule from an Exported Excel File
1. From the Project Conduit Run Schedule window, in the Run Schedule tab, click Export to Excel.
2. Enter a File Name and select a Save Location. Click Save to bring up an Excel file formatted for this feature. Fill out the sheet or save for future use.
3. From the Project Conduit Run Schedule window, in the Run Schedule tab, click Import from Excel.
4. Select the Excel file to load into the project and click Open.
5. Click Apply once the schedule generates in the Project Conduit Run Schedule window.
6. Click on category names to filter each category if needed. Edit data as required.

Expanding the run record
Expanding a run displays the bend angle calculations reported within the Conduit Run Schedule so that the total angles of each run within the run schedule are displayed. Upon initial inspection, you'll notice that the Bend Angle cells are all set to zero. Traversing runs and calculating bend angles is a timely operation, and many changes may occur between the times the Conduit Run Schedule is opened. Instead of automatically loading all of the changes to the project every time the Conduit Run Schedule is opened, you may choose which runs to load.
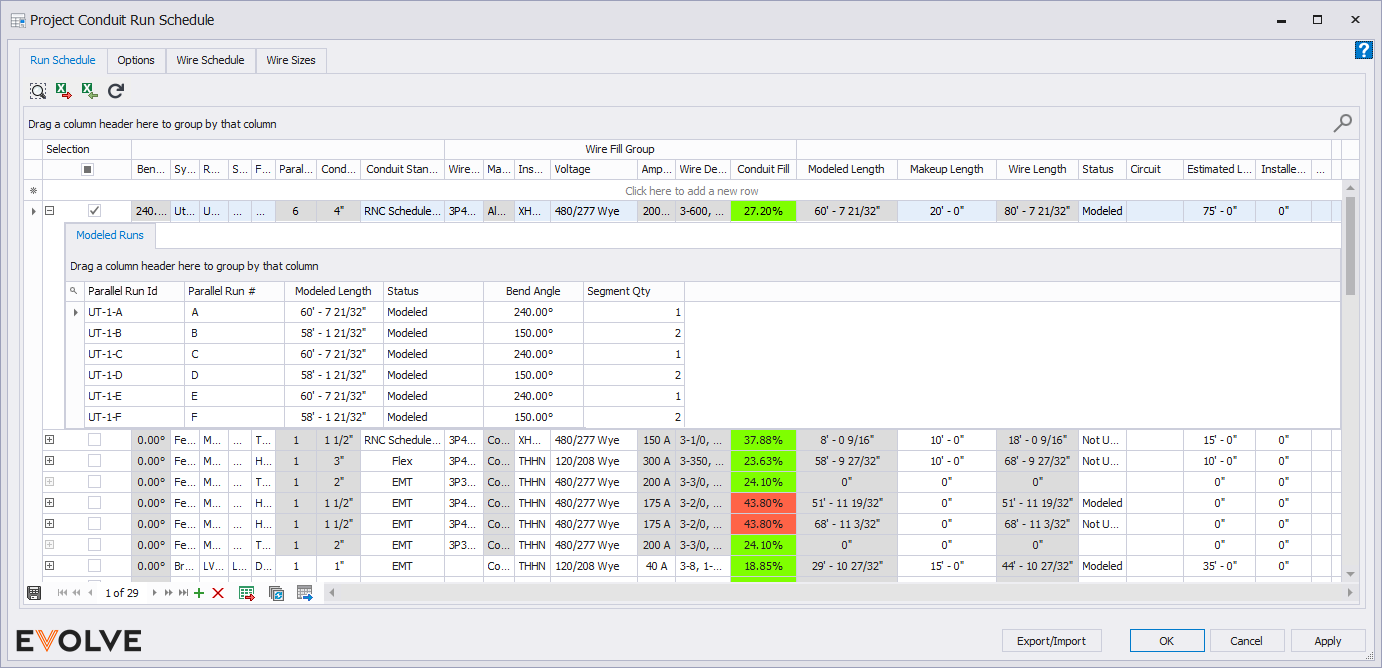
Grid Columns
- Parallel Run Id - Displays the Parallel Run Id assigned to the run.
- Parallel Run # - Defines the parallel run number; the value applied to parameter ‘eE_ConduitRun_ParallelId‘.
- Once defined, the value is appended to the Parallel Run Id. The values are user-definable alphanumeric that are case insensitive and must be unique. Once defined, the value is appended to the Parallel Run Id.
- Modeled Length - Displays the conduit length as currently modeled; the value applied to parameter ‘eE_ConduitRun_Length‘.
- Status - Displays the current Status assigned to the parallel run; the value applied to parameter ‘eE_ConduitRun_Status‘.
- Bend Angle - Displays the total bend angle for the run.
- Segment Qty - Displays the total number of segments in the run.
To load run data
IMPORTANT: the Enable automatic conduit run bend angle calculations checkbox in Workstation Settings must be checked for a conduit run with eE_ConduitRun_Id to have its total bend angle stored in eE_ConduitRun_Angle and each segment total bend angle stored in eE_ConduitRun_SegmentAngle updated automatically to match the total degrees of bend in the conduit run and segments.
- From the Conduit Run Schedule window, in the grid, click each row's Selection checkbox for each desired run you would like to update.
- From the ribbon, click Load Run(s).

Conduit Run Schedule/ Options tab
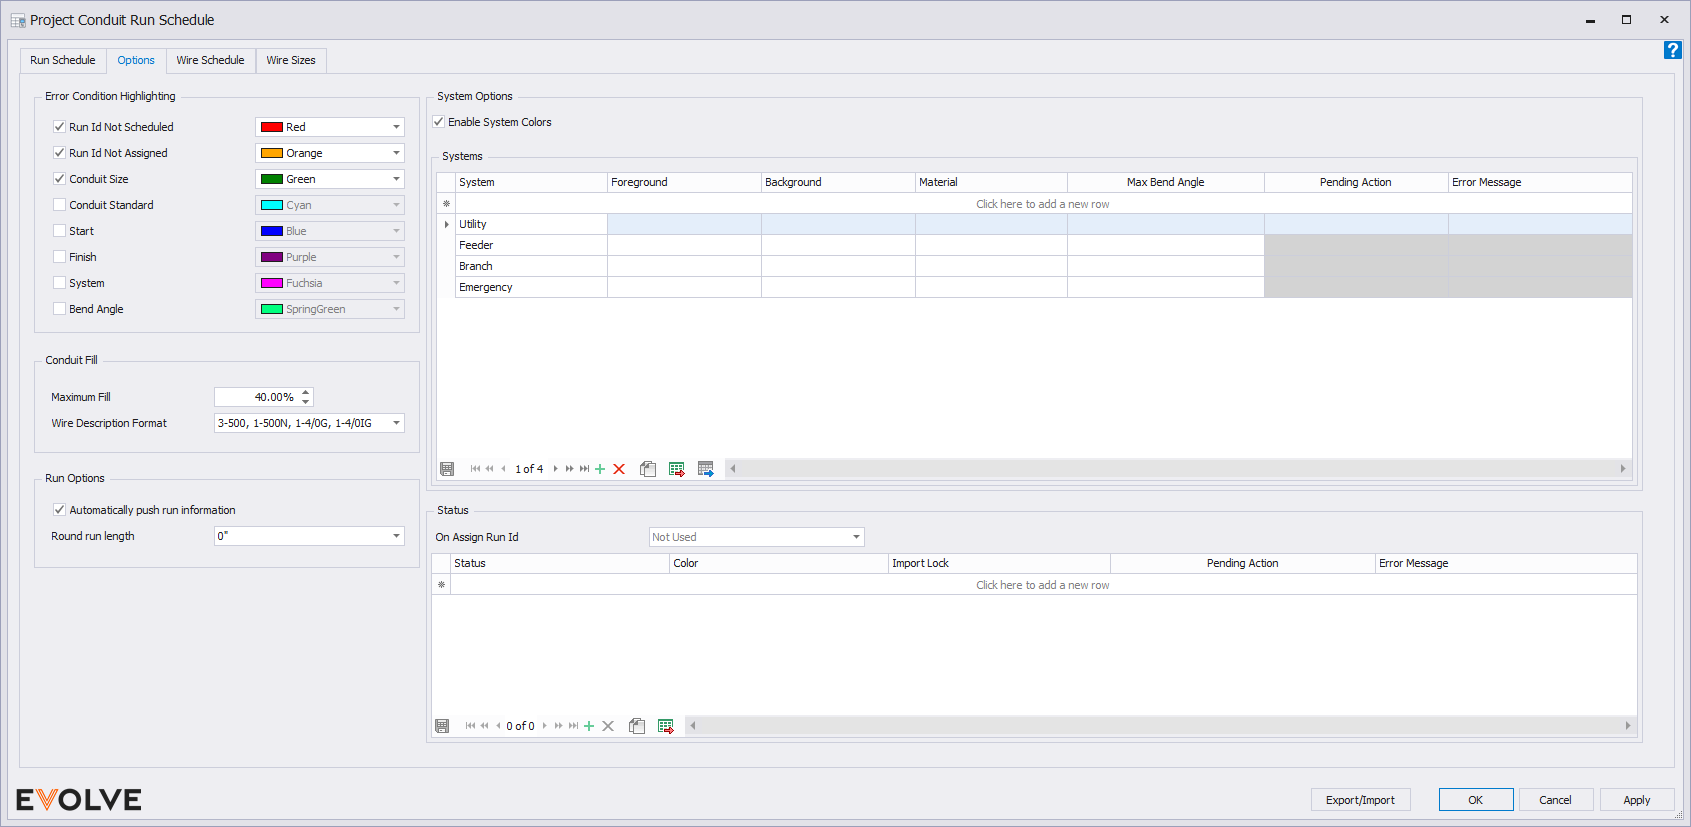
Error Condition Highlighting panel
From the Project Conduit Run Schedule window, in the Options tab, click on applicable boxes to activate highlighting, select the color for each option, and click OK.
- Run Id Not Scheduled- Highlights conduit where a user entered run data directly into the Properties Palate, which does not appear in the run schedule.
- Run Id Not Assigned- Highlights conduit that is not yet assigned a run id.
- Conduit Size- Highlights conduit that was drawn with a different size than listed in the Conduit Run Schedule.
- Conduit Standard - Indicates that the modeled conduit standard does not match the Run Schedule.
- Start - Indicates parameter eE_ConduitRun_Start does not match the Run Schedule.
- Finish - Indicates parameter eE_ConduitRun_Finish does not match the Run Schedule.
- System - Indicates parameter eE_ConduitRun_System does not match the Run Schedule.
- Bend Angle - Indicates parameter eE_ConduitRun_SegmentAngle exceeds the value defined for the Max Bend Angle for the assigned System.
Conduit Fill panel
- Maximum Fill - used to set the fill percentage threshold. When the fill percentage goes above the specified value, the cell is colored red.
- Wire Description Format menu - used to display the Wire Fill Description in the following formats:
- 3-500, 1-500N, 1-4/0G, 1-4/0IG
- 3#500 + 1#500N + 1#4/0G + 1#4/0IG
- (3)500 + (1)500N + (1)4/0G + (1)4/0IG
Run Options panel
- Automatically Push Run Information checkbox - when connecting conduits of differing run ids, the selected conduit's eE_ConduitRun_ parameters are pushed to the connecting conduits without prompting. It is recommended that this option remains checked. The assignment can easily be changed with Assign Run Id.
- Round run length - rounds the run length up to the nearest selected value.
System Options panel
- Enable System Colors checkbox - when checked, system colors are applied to runs when a Run Id is assigned or as they are being modeled.
Grid Columns
- System - used to define system types. Systems are displayed in the Run Schedule grid.
- Foreground - used to set the color and pattern fill of the run's foreground layer.
- Background - used to set the color and pattern fill of the run's background layer.
- Material - used to define the material assigned to the current system. This colorization carries over to Navisworks exports.
- Max Bend Angle - Sets the maximum desired bend for a conduit run.
Record Navigator buttons
- Add - used to add a new row to the grid.
- Delete - used to delete selected row(s).
- Duplicate - used to duplicate selected rows.
- Export Grid - exports the grid as currently displayed to Excel.
- Export to Data Tables - sends the currently displayed content to a Data Table.
Status panel
- On Assign Run Id menu - the selected status is applied when a Run Id is assigned to a run.
Grid Columns
- Status - user-defined condition or state of run.
- Color - defines the color applied to the Status cell in the Run Schedule grid.
- Import Lock - when checked, the selected status is not overwritten when other statuses are imported.
Record Navigator buttons
- Add - used to add a new row to the grid.
- Delete - used to delete selected row(s).
- Duplicate - used to duplicate selected rows.
- Export Grid - exports the grid as currently displayed to Excel.
To Enable System Colors
This feature allows for the assigning of colors, patterns, and materials to conduit runs in a project. The colors can be turned on and off in the Conduit panel of the eVolve ribbon.
To Utilize eVolve System Colors
- From the Project Conduit Run Schedule window, in the Options tab, Click Enable Systems Colors to access its setup
- Under System, Enter the system name of the run that will become colored. The entered text must exactly match one of the Run ids listed in the run schedule tab
- Under Foreground, Select a Color and typically, Solid Fill
- Select a background (pattern fill) and material if needed
- Continue Steps 2-4 as needed to complete setting up the project or what is needed at the time
- Click OK
- System Colors can be toggled on and off from the Conduit panel in the eVolve ribbon.
Conduit Run Schedule/ Wire Schedule tab
Tool Palette buttons
- Export to Excel - exports all data (including hide columns) in an Excel format (.xlsx)
- Import from Excel -imports a data file in an Excel file format (.xlsx)
- New Wire Specification - used to create a wire specification
- Edit Wire Specification - used to modify an existing wire specification
- Delete Wire Specification - removes an existing wire specification
Wire Specification panel
- Wire Specification menu - displays are existing Wire Specifications contained in the current model
- Material dialog box - displays the material associated with the selected Wire Specification
Base Conduit Fill on panel
- Standard menu - in conjunction with the specified Insulation value, both values are used to approximate the Conduit Fill displayed in the grid below.
- Insulation menu - in conjunction with the specified Standard value, both values are used to approximate the Conduit Fill displayed in the grid below.
Grid Columns
- Name - displays the assigned Wire Specification name
- Material - displays the material associated with the Wire Specification
- Wire Fill Id text box - used to assign an Id to the selected Wire Specification
- Amperage text box - used to define the Wire Specification's amperage
- Phase Qty text box - used to define the Wire Specification's phase quantity
- Phase Size menu - displays the available sizes as defined on the Wire Size tab
- Neutral Qty text box - used to define the Wire Specification's neutral quantity
- Neutral Size menu - displays the available sizes as defined on the Wire Size tab
- Ground Qty text box - used to define the Wire Specification's ground quantity
- Ground Size menu - displays the available sizes as defined on the Wire Size tab
- Iso Ground Qty text box - used to define the Wire Specification's isolated ground quantity
- Iso Ground Size menu - displays the available sizes as defined on the Wire Size tab
- Parallel Qty text box - used to define the Wire Specification's parallel quantity
- Conduit Size menu - displays the available conduit sizes
- Conduit Fill - displays the Wire Specification's approximate conduit fill when the Standard and Insulation values are selected in the Base Conduit Fill on panel.
Record Navigator buttons
- Add - used to add a new row to the grid.
- Delete - used to delete selected row(s).
- Duplicate - used to duplicate selected rows.
- Export Grid - exports the grid as currently displayed to Excel.
- Send to Data Tables - send all displayed columns and their values to Data Tables.
Conduit Run Schedule/ Wire Sizes tab
Tool Palette buttons
- Export to Excel - exports all data (including hide columns) in an Excel format (.xlsx)
- Import from Excel -imports a data file in an Excel file format (.xlsx)
Grid Columns
- AWG text box - used to define the wire gauge size
- Insulation text box - used to define the material casing the wire
- Material text box - used to define the wire material
- Wire Diameter text box - used to define the diameter of the wire
- Ampacity text box - used to define the maximum current rating of the wire
Record Navigator buttons
- Add - used to add a new row to the grid.
- Delete - used to delete selected row(s).
- Duplicate - used to duplicate selected rows.
- Export Grid - exports the grid as currently displayed to Excel.
- Send to Data Tables - send all displayed columns and their values to Data Tables.

Tips and Tricks
Custom Columns in the Run Schedule
Custom columns may be added to the Conduit Run Schedule using Parameter Settings.
Custom columns have the following attributes:
- Automatically pushed through conduit run with other Conduit Run Schedule parameters when a run Id is assigned.
- Included in Export to Excel.
- When included in the Excel file imported via Import from Excel, custom columns are applied to the imported conduit run Id's.
Relevant Articles
Using grids in the eVolve software