Auto Route
![]() Updated 10 months ago
by
Kerry Poe
Updated 10 months ago
by
Kerry Poe
Auto Route

Summary
Automatically route conduit runs along a user-defined pathway. This feature requires modeling an EVOLVE Pathway along with Start and Finish elements that align with the project Conduit Run Schedule.
- eVolve tab ⮞ Conduit Data panel ⮞ Auto Route button


Prerequisites

Usage
- Place elements (commonly equipment) corresponding with the Start and Finish of conduit runs from the Conduit Run Schedule, identifying each element's Id Parameter.
Note: Id Parameter is configured in Auto Route Settings and is set to Equipment_Id by default. - Create a pathway for conduit runs by utilizing the eE_PW_Pathway family. Routing with elbows, tee's, and crosses are supported. Offsetting and vertical rises/falls are also supported.
NOTE: Load the eE_PW_Pathway family from System Families. - From the eVolve Electrical ribbon, in the Conduit Data panel, click Auto Route.
- From the Auto Route window, use the grid to select the desired conduit runs.
- Click OK.
NOTE: Start and Finish elements must be within the configured distance configured of the selected pathway. See Distance From Pathways in Auto Route Settings.

Window Overview
Routing Options panel
- Extend to Equipment checkbox - This option adds an elbow and a straight conduit that extends to the Start and Finish equipment elements.
NOTE: This option will "stub down" or "stub up" to the equipment from the pathway.
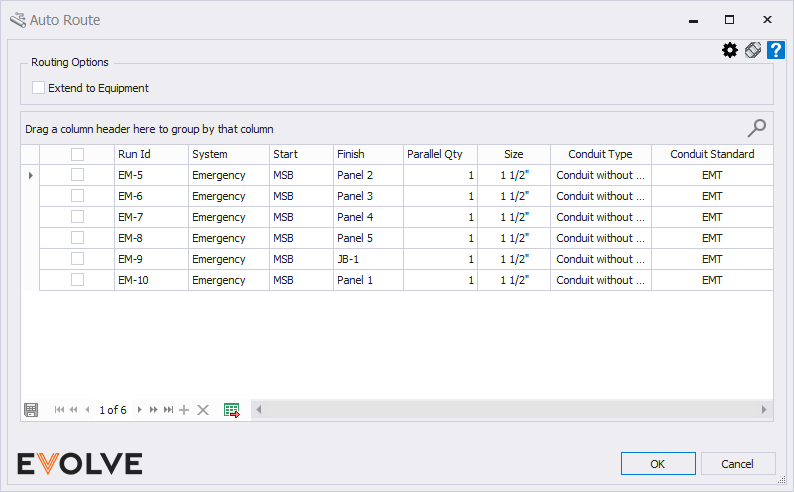
Available Runs panel
Grid Columns
- Selection - Used to select conduit runs for automatic routing.
- Run Id - Inherited from the Conduit Run Schedule, displays the user-defined run identifier.
- System - Inherited from the Conduit Run Schedule, displays the systems defined in Conduit Run Schedule Options.
- Start - Inherited from the Conduit Run Schedule, displays the Equipment Id where the run originates.
- Finish - Inherited from the Conduit Run Schedule, displays the Equipment Id where the run terminates.
- Parallel Qty - Inherited from the Conduit Run Schedule, displays the number of parallel conduits in a run.
- Size - Inherited from the Conduit Run Schedule, displays the conduit size of the run.
- Conduit Type - Inherited from Conduit Type in the Conduit Run Schedule, displays the conduit type of the run.
- Conduit Standard - Inherited from Conduit Standard in the Conduit Run Schedule, displays the conduit standard of the run.

Tips and Tricks
- For multi-tier runs use Auto Route to place conduit runs at one elevation, then adjust the pathway to a new elevation and place more Runs.
NOTE: Runs will be routed at the Middle Elevation of the pathway family. - The width of the pathway does not constrain how many conduits can be placed on the pathway.
