Error Check
Conduit Error Check
Analyzes the model for inaccuracies, highlighting mistakes as compared to the Conduit Run Schedule. The Error Check function performs the following checks when selected:
- Run Id Not Scheduled - highlights conduits if there are any conduits in the project that have run id's that are not listed in the schedule. This error can happen if the user enters a run id manually in the family properties rather than using the assign run id function.
- Run Id Not Assigned - highlights conduits if they have not had a run id assigned yet.
- Size - highlights conduits when the value in the eE_ConduitRun_Size does not match the Size value specified in the conduit's Run Specifications.
- Start - highlights conduits when the value in the eE_ConduitRun_Start does not match the Start value specified in the conduit's Run Specifications.
- Finish - highlights conduits when the value in the eE_ConduitRun_Finish does not match the Finish value specified in the conduit's Run Specifications.
- Type - highlights conduits when the value in the eE_ConduitRun_Type does not match the Type value specified in the conduit's Run Specifications.
- System - highlights conduits when the value in the eE_ConduitRun_System does not match the System value specified in the conduit's Run Specifications.
Run Id Not Scheduled, Run Id Not Assigned, and Size are enabled by default.
To Perform an Error Check
From the eVolve Electrical ribbon, in the Conduit Data panel, click the Error Check.
Modifying Error Conditions
- From the eVolve Electrical ribbon,in the conduit panel, click Conduit Run Schedule.
- From the Conduit Run Schedule window, click the Options tab.
- From the Error Condition Highlighting panel, check or uncheck the desired conditions and click OK.
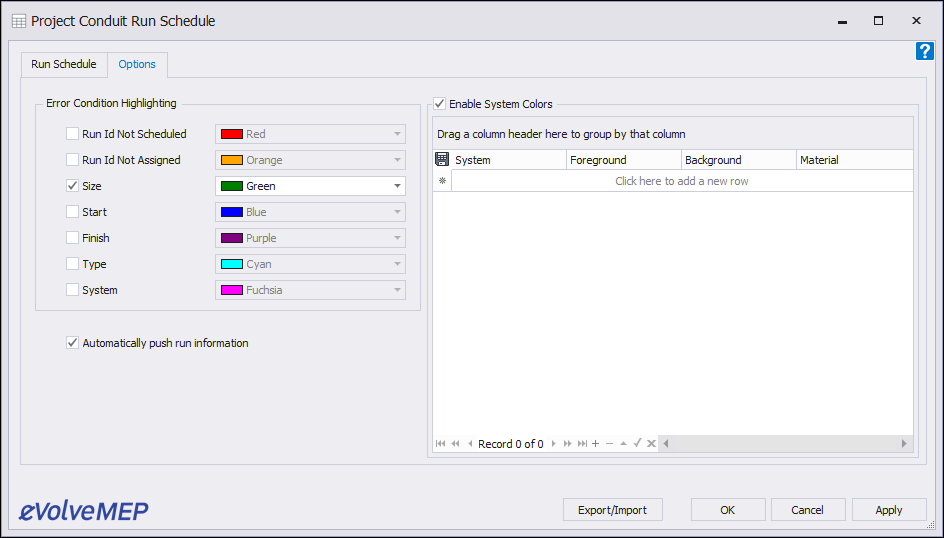
Modifying Highlighting Color
- From the eVolve Electrical ribbon, click the Conduit menu and click Conduit Run Schedule.
- From the Conduit Run Schedule window, click the Options tab.
- From the Error Condition Highlighting panel, click the color drop-down menu, click either the Custom, Web, or System tab, click a color tile to select, and click OK.
The error condition must be enabled in order to modify the color.
From the Custom tab in the color drop-down, right-click on any of the tiles in the bottom two rows to define a custom color.
