Cable Schedule
Cable Schedule

Summary
Once cable runs have been drawn and assigned, eVolve Electrical concatenates the device and cable data into the Project Cable Schedule window. From the Project Cable Schedule window, users can export to an Excel file for creating cut lists, adjust Error Check settings, and choose make-up lengths.
- eVolve tab ⮞ Cabling panel ⮞ Cable Schedule button


Usage
- From the eVolve ribbon, in the Cabling panel, click Cable Schedule
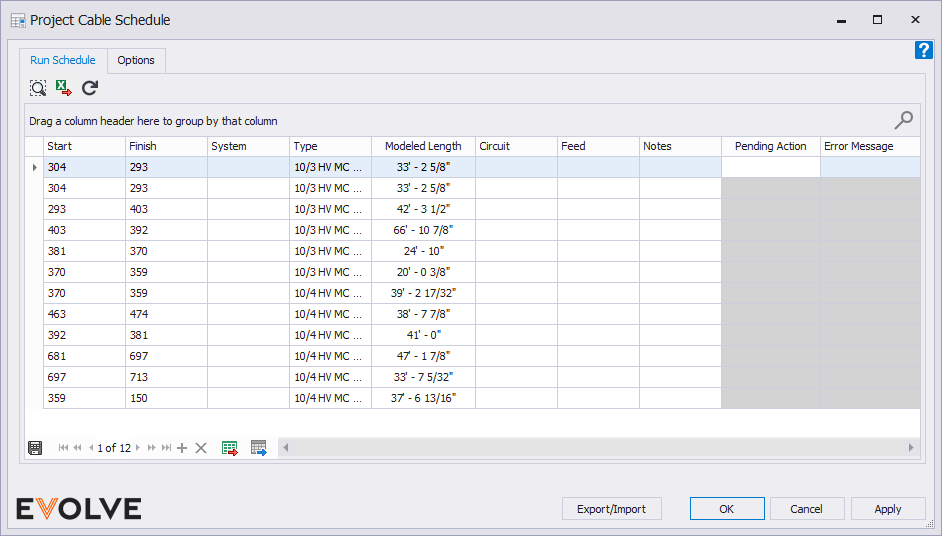
- The Run Schedule tab contains a grid list of all active cable runs in the project.
- The Options tab lets you set the various cabling options for all cabling tools.

Window Overview
Cable Schedule Window
Tool Palette buttons
- Locate Element - used to locate a single element in the model. If the selected element is in the currently active view, Locate Element will zoom to and display the element in fullscreen. If the selected element is not in the currently active view, Locate Element will allow Revit to find the element
- Export to Excel - exports all data (including hide columns) in an Excel format (.xlsx)
- Refresh Cable Data - performs a refresh of selected entries based on the device they are currently assigned to.
Project Cable Schedule
- Start- Starting device, which is the first device clicked when creating a run, and where the run data is assigned to. The number is an auto-assigned Revit mark.
- Finish- Ending device, which is the second device clicked when creating a run. The number is an auto-assigned Revit Mark
- System- Displays the system type of the run
- Type- Displays the cable type used for the run
- Modeled Length- Displays the lengths of the cable in the run
- Circuit- Displays Circuit data if the run is made in conjunction with Revit power systems
- Feed- Displays Feed data if the run is made in conjunction with Revit power systems
- Notes- Field for user-entered note
- Pending Action- Displays status
- Error Message- will inform if there's been an error within the row
Record Navigator buttons
- Export Grid - exports the grid as currently displayed to Excel
- Send to Data Tables - send all displayed columns and their values to Data Tables
Cable Schedule Options
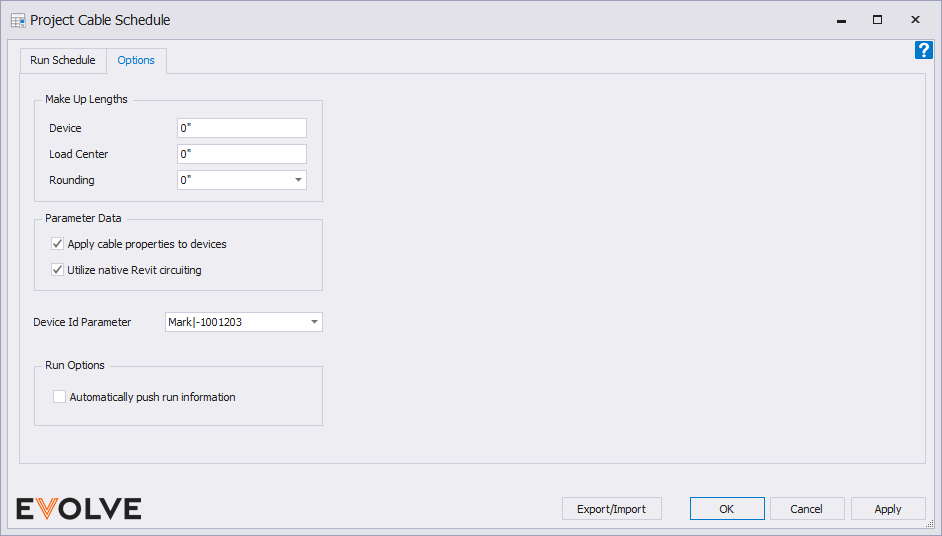
Make Up Length panel
- Device - the value is added to the overall run length of each cable connected to a device.
- Load Center - the value is added to the overall run length of each cable connected to a Load Center.
- Rounding - used to increase the overall run lengths and make up lengths to the nearest specified value.
Parameter Data panel
- Apply cable properties to devices - When enabled, the cable properties (Type & Model Length) are assigned to the device material parameters. This allows the device to be scheduled with the cable(s) as part of the BOM.
- Utilize native Revit circuiting - When enabled, the devices Circuit and Feed are automatically applied to the eE_ConduitRun_Circuit and eE_ConduitRun_Feed cable parameters.
Other Options
Device Id Parameter - sets a text-based parameter used to specify a Device Id.
Run Options
- Automatically push run information checkbox - When checked, allows two cables from different assigned runs to join into one run without a prompt to choose which run name to keep for the description. It is recommended that this option remains checked. The assignment can easily be changed with Assign Cable.

Tips and Tricks
- Before using the cabling feature within EVOLVE, open the Cable Schedule and confirm the options tab has all project requirements set correctly.
