Point Manager

Point Manager

Summary
Allows users to view/modify point information, update statuses, and export points.
- eVolve tab ⮞ Points panel ⮞ Point Manager button


Prerequisites

Usage
Auto-Number
Auto-numbering points
IMPORTANT: While the modified values appear in the cell(s), the changes have not been committed. Before closing the Point Manager window and possibly performing other actions you MUST click Apply to commit the changes, failure to do so will result in the loss of all modifications made in the session or a data conflict when performing other actions.
- From the Point Manager window, select the desired points from the grid, and click Auto Number from the tool palette.
- From the Auto-Number window, type a value in the Starting Value dialog box and click OK.
NOTE: This field supports dynamic naming; you may specify any parameter, even if it's not displayed in the list, by wrapping it in angle brackets or chevrons - e.g., <ParameterName>.
NOTE: Points are renumbered sequentially in the order they appear in the grid. Alphanumerical values must end in a numerical value.

Bulk Update Information
Applying bulk updates to points
- From the Point Manager window, select the desired points from the grid, and click Bulk Update from the record navigator.
- From the Bulk Update window, select the desired field from the Field Name menu, type a value in the Value dialog box, and click Apply.
- From the Bulk Update window, continue updating or click Close to end update session.

Export Grid
The Export Grid feature allows for changes to the grid's column order to be reflected in the export file, i.e. if format of the .CSV file needs the XYZ fields to be ordered YXZ
Exporting grid data
- From the Point Manager window, select the desired points from the grid, and click Export Grid located in the tool palette.
NOTE: Make sure the columns are arranged properly before clicking the Export Grid button.
- From the Write Point Manager data to Excel window,
- Navigate to the desired save location
- Enter a value in the File Name dialog
- Select the desired format in the Save as type menu
- Then click Save.
- Continue working in the Point Manager window or click Cancel to close.
TIP: Use Grid States if you have multiple common export formats in order to save these configurations.

Importing Points
- From the Point Manager window, click Import Points located in the tool palette.
- From the Import Points window, click Browse.
- From the Import Points window, navigate to the desired file containing the necessary points for import and click Open.
- From the Import Points window, click OK.
TIP: you may also create additional Point Family Types to use when the default types from the Point Family Type Name menu are insufficient.
NOTE 1: The columns header must be named correctly in order for the point to import properly. Exporting the current grid from Point Manager will create a file with the expected column header names.
NOTE 2: CSV files are not expected to have line breaks within fields. Each line in the CSV file contains an entire entry of data.
Exporting Points
- From the Point Manager window, select the desired points from the grid, and click Export Points located in the tool palette.
- From the Save Point Export File window,
- Navigate to the desired save location
- Enter a value in the File Name dialog
- Select the desired format in the Save as type menu. CSV and TFLX file types are supported.
- Then click Save.
- Continue working in the Point Manager window or click Cancel to close.

Window Overview
The Point Manager allows for points contained in the model to be modified, sorted, filtered, imported, and exported.
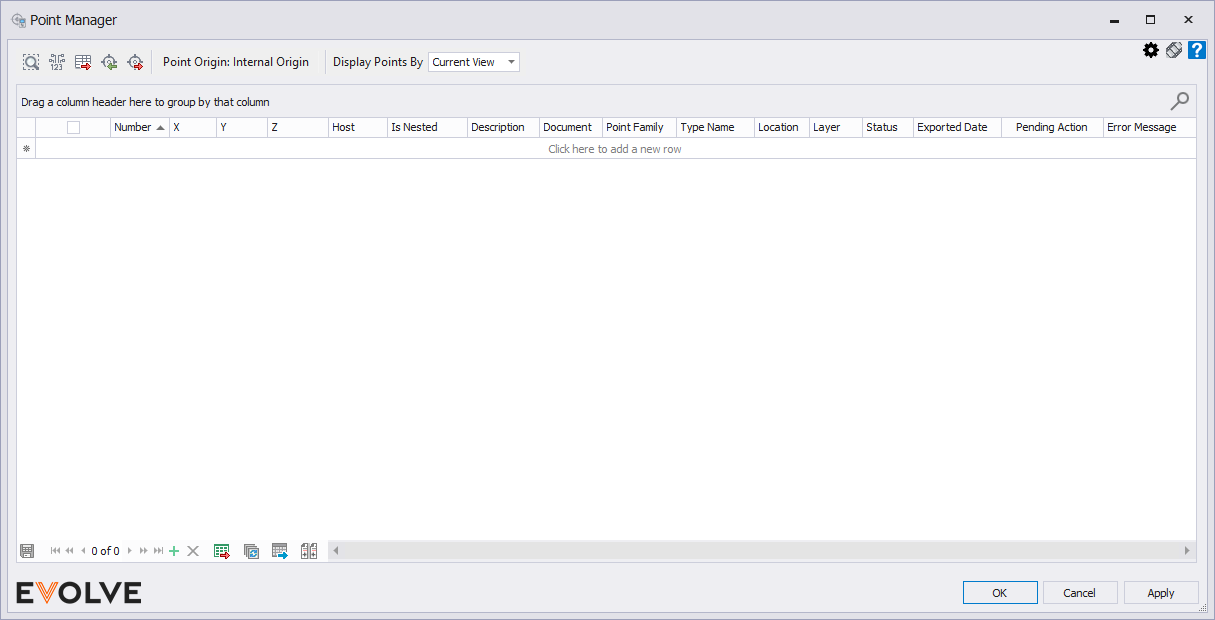
The Point Manager allows for points contained in the model to be modified, sorted, filtered, imported, and exported.
The Point Manager tool palette
- Locate Element - used to locate a single element in the model. If the selected element is in the currently active view, Locate Element will zoom to and display the element in full screen. If the selected element is not in the currently active view, Locate Element will allow Revit to find the element.
- Auto Number - applies numerical/alphanumerical values to multiple selected points.
- Export Grid - exports the grid state (the current arrangement of the columns) into a .csv or .xlsx file of the rows selected in the manager. e.g., users may rearrange the columns to export Y,X,Z instead of X,Y,Z.
- Import Points - import points from a .csv, .xlxs, or .xls file.
- Export Points - creates .csv or .tflx of the rows selected in the manager.
- Point Origin - displays the origin type set within the Point Settings window.
- Display Points By menu - allows points displayed in the grid to filter by Project, Current View, or Current Selection.
Grid Columns
- Number - the numerical/alphanumerical value assigned to the point.
- X - the X-axis(east/west) coordinate.
- Y - the Y-axis(north/south) coordinate.
- Z - the Z-axis(elevation) coordinate.
- Host - a read-only field used to display the element that the point is attached/connected to.
- If Nested = Yes then the Point Manager will list the name of the host family. For example, the point eV_Point is nested into Round Strap Hanger, therefore Round Strap Hanger is listed as the Host.
- Is Nested - a read-only field that denotes if the point is embedded within another element.
- No - an eV_Point is contained within the view/model but is not nested within another element.
- Yes - the view/model contains an eV_Point which is nested within other elements such as sleeves, floor drains, etc.
- Description - used to provide additional information about the point.
- Document - a read-only field that displays the document that the point is associated with.
- Point Family - a read-only field that displays the name of the point family.
- Type Name - a read-only field that displays the type of the point family.
- Location - a read-only field that displays the eV_LBS_Id of the point.
- Layer - information used when exporting a TFLX point file.
- For Fabrication Hangers, eVolve uses the Service Name as the Layer.
- For eV_Points, the Layer field is empty and may be user-defined.
- Status - a read-only field that displays the calculated status.
- Placed - default assignment when placed in the model. The status remains Placed until the point is exported, even if the point's attributes are modified.
- Modified - may only be assigned after the point status is "Exported" and an exportable field is changed (Number, Description, XYZ, Layer, etc). After the "Modified" point is exported, the status reverts to Exported and the timestamp is updated.
- Exported - default assignment when exported. The status remains Exported unless modified, then the status changes to Modified. When exported, the Export Date field is updated with the current timestamp.
- Exported Date - a read-only field used to display the timestamp of when the point was last exported.
NOTE: Point Number, Description, and Layer cannot be edited on Computed points.
Record Navigator buttons
- Add - used to add a new row to the grid.
- Delete - used to delete selected row(s).
- Bulk Update - applies changes to values for select fields on multiple selected points.
- Export Grid - exports the grid state (the current arrangement of the columns) into a .csv or .xlsx file of the rows selected in the manager. e.g., users may rearrange the columns to export Y,X,Z instead of X,Y,Z.
- Bulk Update - applies changes to values for select fields on multiple selected points.
- Data Table Export - creates .csv or .tflx of the rows selected in the manager.

Custom Coordinates
Export (Legacy)
Exports the eE_Point family which is not displayed in the Point Manager. Upgrading to the eV_Point family is recommended.
