Define Package


Summary
Sometimes spools are only a piece of the workflow. Whether it's packaging multi-trade racks or entire electrical rooms, multiple spools often need to be packaged and assembled as one. Prefab Packages makes this process seamless by allowing the user to quickly define multiple spools to a package and create deliverables right from the model.
- eVolve tab ⮞ Prefabrication panel ⮞ Define Package button


Usage
Defining a Package
- From the eVolve ribbon, in the Prefabrication panel, click Define Package.
- From the Create/Define Package window, enter a package name, select desired options, and click OK.
- From the drawing area, using a window selection or crossing window selection, choose the desired elements to include in the package and click Finish from the Options Bar.
- Continue to select elements for other packages or click Finish in the Options Bar to complete the session.

Window Overview
NOTE: The Create/Define Package's predefined selection filter can be modified via the Selection Configuration. Please see the link in the Relevant Articles below.
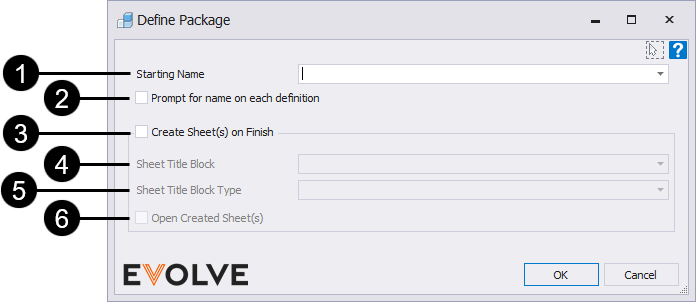
- Package Name - The value specified will be applied to all elements selected to be included in the package. While the name may be alphanumeric, it must end with a numeric value.
- Prompt for name on each definition - when enabled, the Define Package window is displayed after defining every package, providing an opportunity to assign a unique name to each package.
- Create Sheets(s) on Finish - If enabled, eVolve will create the sheets for the defined packages(s) on finish using the title-block defined in step 3. If disabled, the package sheets may be created within the Prefab Manager.
- Title Block - If Create Sheet(s) on Finish is enabled, the selected Title Block will be applied to all defined packages.
- Title Block Type - If applicable, this field is used to define the type of the selected title block family.
- Open Created Sheet(s) - if enabled, all created sheets will open after completing the session.
NOTE: Packages may be defined and created at the same time, or they may be defined and then created through the Prefab Manager.

Tips and Tricks
Managing Packages
Once created, there are various ways to monitor and maintain packages within a model.
All package information is contained within shared parameters that are visible from the Revit Properties Panel. This allows for view filters, as well as Element Filters, to quickly be created for finding and displaying package information.
The parameter "eV_PackageId" is the parameter used by EVOLVE to identify a package. Parameters starting with "eV_Package..." should not be modified manually.
This information is also available within the Spool Manager.
Package Template Titleblocks
- Ensure package parameters are unchecked in any view templates used for package title block templates.
- Ensure there is not default plan view template in the project. This will override the chosen view template from the prefab sheet.
- Remember to stretch schedules to match the size needed on the sheet before saving them as a view template. When modifying a schedule use the Resize button to measure the width of the schedule, set the width of the schedule in the corresponding titleblock view window. Modify Schedule/Quantities tab ⮞ Columns panel ⮞ Rezise button.


Naming Packages
Package names may be automatically generated by utilizing the parameters of the elements contained within the package. While users can specify a value to apply to a defined package, the Package Name dialog is also a menu containing Revit and eVolve parameters. The parameters may be appended or chained together to provide a more descriptive name.
The bolded value below will generate the following spool names.
Electrical Examples
- <eE_ConduitRun_System> - <eV_LBS_Id> - 01
- Branch - L1A-01
- Feeder - L2B -02
- Fire Alarm - L3C -03
Mechanical Examples
- <eM_Service Name> - <eM_Service Type> - 01
- Return Air 2wg - Rectangular Duct -01
- Return Air 2wg - Rectangular Duct -02
- Return Air 2wg - Round Duct -03
