Define Spool


Summary
Used to create a Revit assembly for selected components.
- eVolve tab ⮞ Prefabrication panel ⮞ Define Spool button


Usage
To Define a spool
- From the eVolve ribbon, click Define Spool from the Prefabrication panel.
- From the Create/Define Spool window, enter a spool name, select the desired option, and click OK.
- From the drawing area, using a window selection or crossing window selection, choose the desired elements to spool and click Finish in the Options Bar.
- Continue to select elements to spool or click Finish in the Options Bar to complete the session.

Window Overview
NOTE: The Create/Define Spool's predefined selection filter can be modified via the Selection Configuration. Please see the link in the Relevant Articles below.
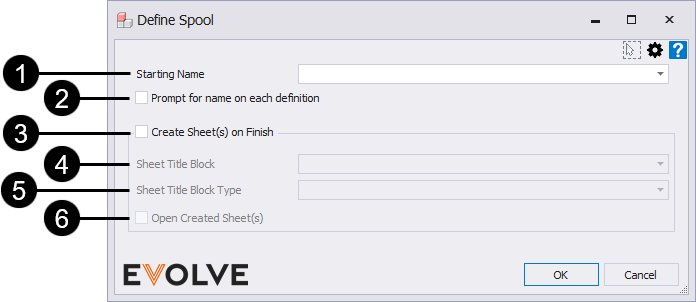
- Starting Spool Name - The value specified will be applied to all spools created in the session. While the name may be alphanumeric, it must end with a numeric value.
- Prompt for name on each definition - when enabled, the Define Spool window is displayed after defining every spool, providing an opportunity to assign a unique name to each spool.
- Create Sheets(s) on Finish - If enabled, eVolve will create the sheets for the defined spool(s) on finish using the title-block defined in step 3. If disabled, the spool sheets may be created within the Prefab Manager.
- Title Block - If Create Sheet(s) on Finish is enabled, the selected Title Block will be applied to all defined spools.
- Title Block Type - If applicable, this field defines the selected title block family type.
- Open Created Sheet(s) - if enabled, all created sheets will open after completing the session.
TIP: Spools may be defined and created simultaneously, or they may be defined through the Prefab Manager.

Tips and Tricks
- When a new spool is created, the name is initially set by Revit. Any Parameter Sync based rules, including Colorizer, will execute against the name Revit assumes should be the next spool if the rule is set to run against new elements of type Assembly Instance. The Revit API does not allow changes to the name of the spool until the transaction that creates the spool has been committed. Once the spool is created, EVOLVE applies the name (specified by the user) to the spool. If the rule is set to run on Existing Element Change or Any Update, then the rule will be triggered to execute against the correct name. The Allow Multiple Processing option must be enabled or the rule will only execute on the name initially set by Revit.
- When defining multiple spools, the spool number is auto-incremented.
- After exiting, the last spool number is remembered and auto incrementation continues when resuming Define Spool.
- Spools may be defined from the eVolve Electrical tab or the contextual ribbon.
- The Create Sheet(s) on Finish checkbox is typically used when generating a few sheets. If generating many sheets, use the Spool Manager.
- When defining a spool, existing spools cannot be added to the spool.
- When defining a spool:
- Typical Revit selection methods may be used.
- A single click adds all parts and pieces of nested families to a spool.
- The CTRL key does not need to be pressed to add elements to the spool.
- When selected, elements are typically highlighted and blue in color. However, after being selected, some elements may not appear to be highlighted. Hover the pointer over an element to verify that the element has been added to the spool.
- When hovering, if an element has not been added a plus symbol (+) appears, click to add the element. If an element has been added, a minus symbol (-) appears, click to remove the element.
- Spool names may be automatically generated by utilizing the parameters of the elements contained within the spool. While users can specify a value to apply to defined spools, the Starting Spool Name dialog is also a menu containing Revit and eVolve parameters. The parameters may be appended or chained together for a more descriptive name.
The bolded value below will generate the following spool names - Spools created with titleblocks that contain Assembly View Windows will limit the resulting views to elements within the assembly.
Electrical Examples
- <eE_ConduitRun_System> - <eV_LBS_Id> - 01
- Branch - L1A-01
- Feeder - L2B -02
- Fire Alarm - L3C -03
Mechanical Examples
- <eM_Service Name> - <eM_Service Type> - 01
- Return Air 2wg - Rectangular Duct -01
- Return Air 2wg - Rectangular Duct -02
- Return Air 2wg - Round Duct -03
