Add/remove Unions
![]() Updated 10 months ago
by
Adam Heon
Updated 10 months ago
by
Adam Heon
Add/Remove Unions

Summary
The EVOLVE add/remove union feature allows the insertion of couplings along a selected run of conduit (or any system family).
- eVolve tab ⮞ Conduit Bends panel ⮞ Add/Remove Unions button


Usage
To place unions
- From the eVolve Ribbon, in the Conduit panel, click the Add/Remove Unions button
- From the drawing area, select the run(s) to add unions.
- From the Options Bar, click Finish
- From the Add/Remove Unions window, select the desired options in the Place Unions panel and click OK.
- From the drawing area, click toward the left or right of the view to show which direction to implement the change.
To delete unions
- From the eVolve Ribbon, in the Conduit panel, click the Add/Remove Unions button
- From the drawing area, select the run(s) to remove unions.
- From the Options Bar, click Finish
- From the Add/Remove Unions window, select the desired traversal option in the Delete Unions panel and click OK.
- From the drawing area, click toward the left or right of the view to show which direction to implement the change.
NOTE: The Add/Remove Unions' predefined selection filter can be modified via the Selection Configuration. Please see the link in the Relevant Articles below.

Window Overview
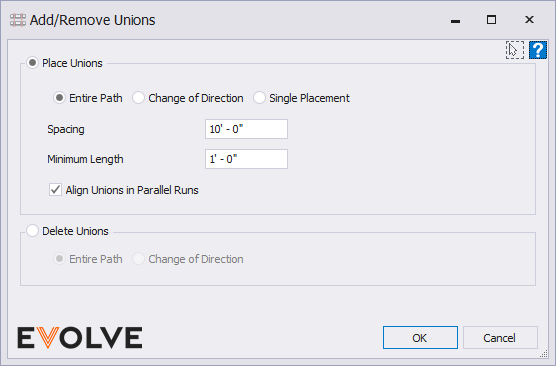
Place Union radio button panel
- Entire Path - places unions along the entire run.
- Change of Direction - places unions from the defined starting point and direction until the direction changes, like an elbow, tee, cross, etc.
- Single Location - allows users to point and click to place a union along the run.
NOTE: when placing a single union, the command will stay active until the ESC button is pressed. - Spacing - used to specify the spacing between unions. The default spacing is 10’ - 0".
- Minimum Length - if the length of the last straight in the run exceeds the Spacing + Minimum Length, then the union is moved back to ensure the last straight maintains the defined minimum length. For example, if the last straight section is 10' - 6" and the defined spacing is 10' - 0", then the union is placed at 9' 6" instead of 10' - 0" to maintain a 1' - 0" minimum length at the end of the run.
- Align Unions in Parallel Runs - when unchecked, each run has unions placed independently from other runs.
Delete Union radio button panel
- Entire Path - removes all unions along the entire conduit run
- Change of Direction - removes all unions from the defined starting point and direction until the direction changes, like an elbow, tee, cross, etc.

Tips and Tricks
- When modeling with eVolve Electricals advanced conduit tools, such as optimize bends and auto-couplings, we recommend using the following workflow:
- Model conduit runs utilizing our smart bend families. (Without adjusting them)
- Use Align Conduit when necessary for conduit spacing
- Optimize the bends using Consume Selected End and/or Consume Adjacent Ends commands and make any adjustments
- Use Align Couplings to align the bend couplings
- Use Place Couplings to place couplings along the run (We recommend using the "Change of Direction" option when using this workflow and using steps 2-5 section by section)
- Staggering couplings - unchecking the Align Unions in Parallel Runs checkbox will stagger the couples so that couplings do not block tools like wrenches when tightening compression couplings.
